printed guides

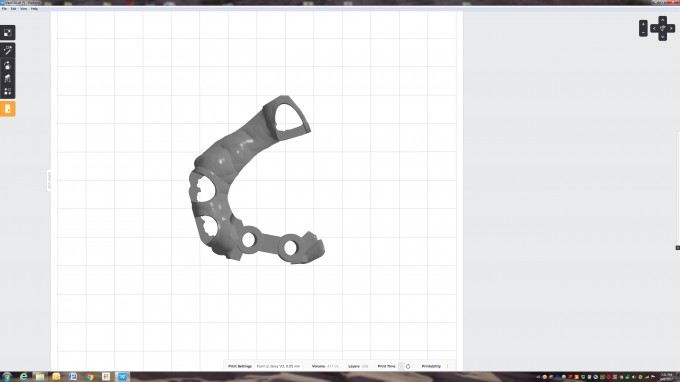
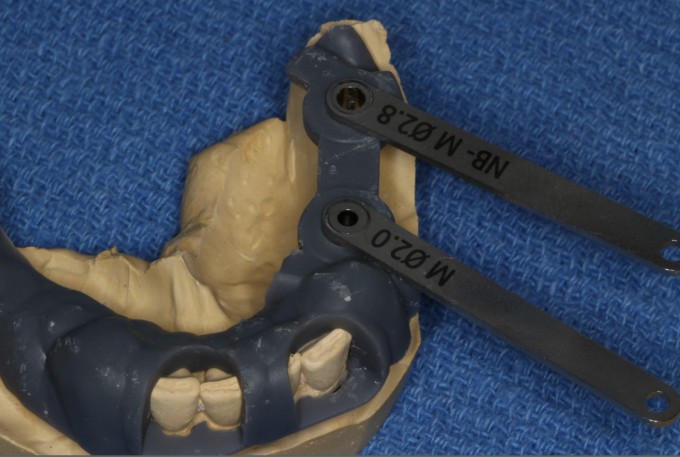
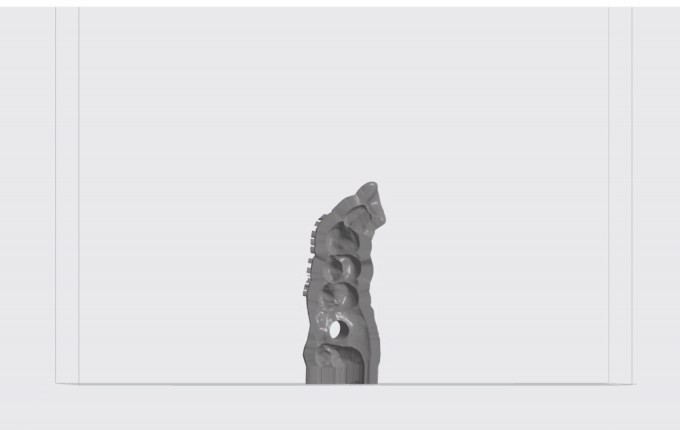
I had my Form 2 printer delivered last week and it's been so much fun playing with it. This patient presented with fractured teeth @ #20 and #21 with missing 18,19. We decided on a plan to extract the roots 20 and 21, place implants @ #19 & #21 and make a 3 unit bridge. In the past, I would have sent for a Sicat guide or made 2 CG2's, but I want to go over the workflow for a printed guide since I have a new toy.
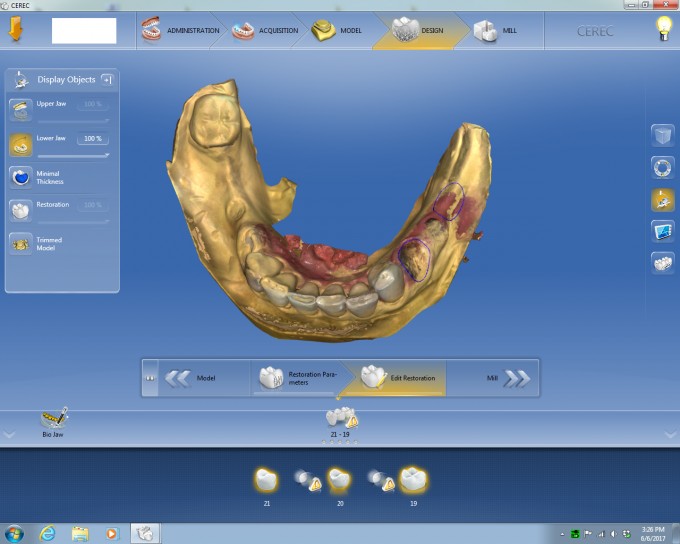
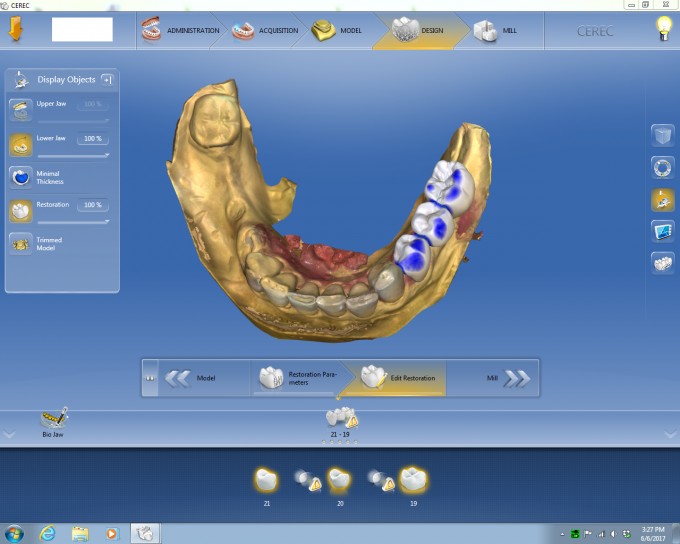
First, the patient (or a model in this case) is scanned with CEREC and a bridge designed so that I can incorporate my plan into Galaxis with one .ssi file.
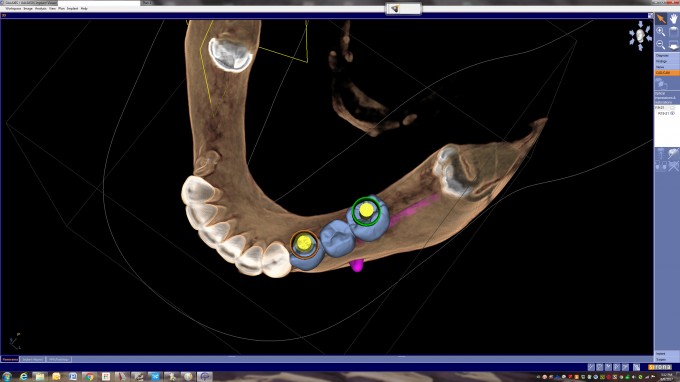
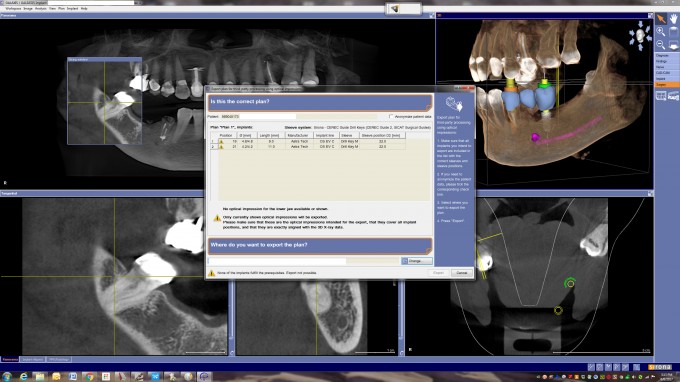
The implants are planned in the usual way, including setting D2 and choosing a CG2 sleeve. The CMG.DXD file is then exported in the same way as you would for milling a guide. Since I don't have inlab, I sent this file via dropbox to Frankie at AA Dental and in a day, he converted my file to a .STL file.
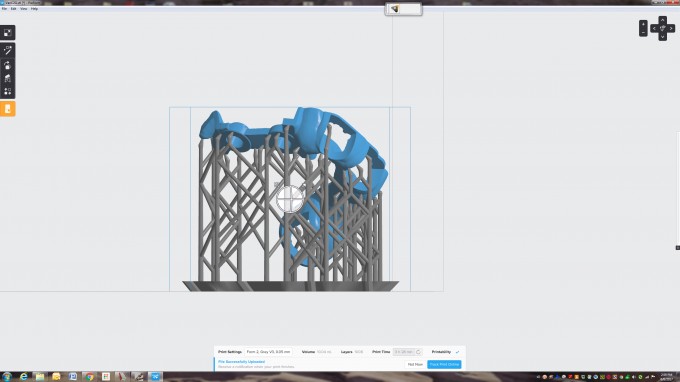
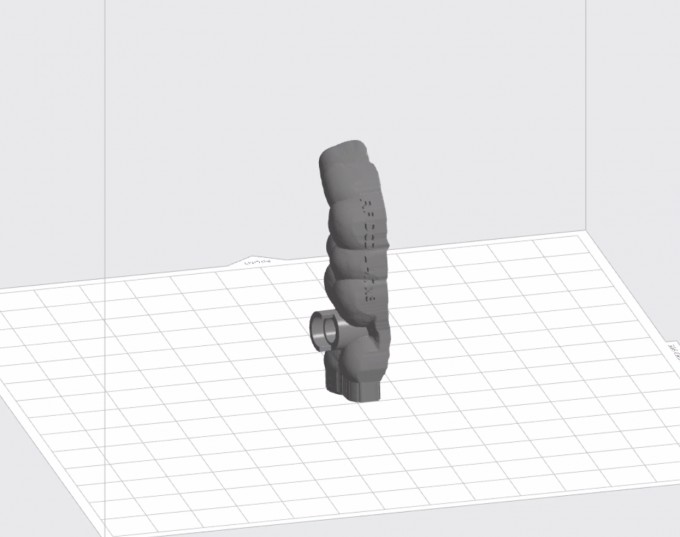
In the preform software that comes with the printer, I was able to add supports so that it prints properly (these can be edited away from critical areas).
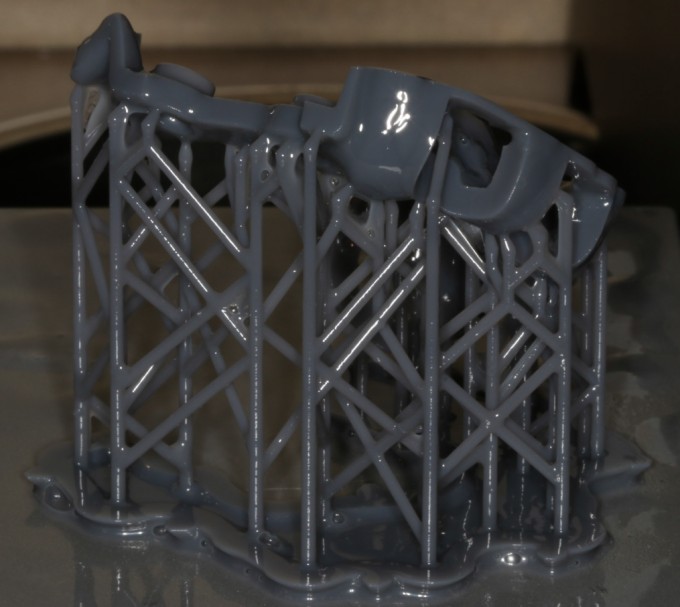
Once the supports are removes (kind like the sprues on a milled guide), the guide was tried on the model. It really is very easy to remove them.
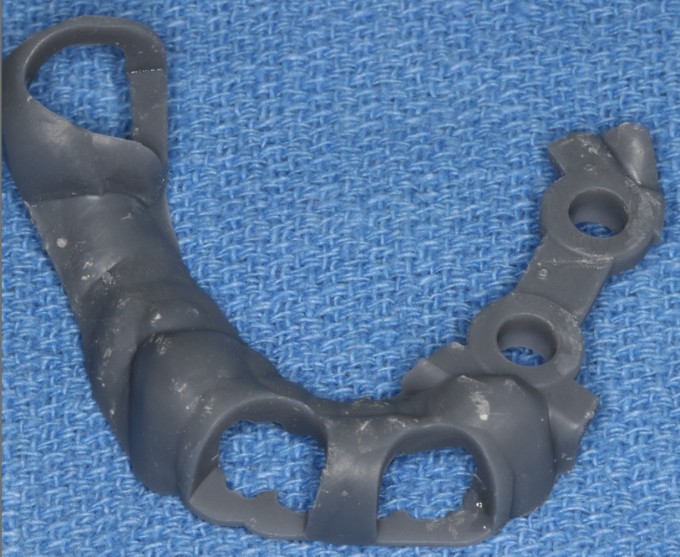
This entire process took a day and cost about $20 for the stl conversion and about $7 in material. Just another option with a pretty easy workflow. It's also fun to play with!


Great workflow Dan, isn't printing cool!
Try using the DentalSG resin from FormLabs - it's FDA approved for surgical guides, but it does require some post curing with UV.


On 6/7/2017 at 10:31 am, Ted Chamberlain said...Looks great! How is the learning curve with the printing software?
One of the easiest things I have ever used. It's amazing how easy the process it.

I have not seen any documentation that SG is actually FDA approved. There are two European certifications of conformity and biocompatibility. There is sort of an implied FDA approval with this, but I have not seen anything actually showing approval. Kind of reminds me of the debate over non approved implant parts that have an ISO conformity statement, and sometimes a 510k application in, but no actual approval. Obviously, there is a difference between an implantable device, and abutment, and a surgical guide. I am not 100% clear how critical that is in a material that is only in the mouth for a few minutes. Interesting times ahead for all of us.
https://formlabs.com/materials/dentistry/
On 6/7/2017 at 10:17 am, Meena Barsoum said...Great workflow Dan, isn't printing cool!
Try using the DentalSG resin from FormLabs - it's FDA approved for surgical guides, but it does require some post curing with UV.
The DentalSG just came in this morning! The cool thing is that it's so easy to print again.
After it prints, what is involved with completing the guide?
I know that Form Labs just came out with Form Wash and From Cure. I am assuming they came out with these because that is a necessary step in the guide finishing process?
Form Labs doesn't have any local reps like most dental companies do they?
The resin that I used just requires a soak in alcohol for 20 minutes. As Meena said, the dental resin also requires uv light after the alcohol bath for the final cure. It's my understanding that the DentalSG resin can be autoclaved if you choose.
Awesome! Thanks so much. Keep us updated please with the many other uses you choose to apply to the prints.

"The implants are planned in the usual way, including setting D2 and choosing a CG2 sleeve. The CMG.DXD file is then exported in the same way as you would for milling a guide. Since I don't have inlab, I sent this file via dropbox to Frankie at AA Dental and in a day, he converted my file to a .STL file."
Question on the process... So you placed your implants in software, then exported the CMG.DXD file to Frankie, did he design the surigical guide for (window placement, etc.) then send it back as an STL file? For $20?
On 6/7/2017 at 11:09 am, Ben Jump said...Looks great, Dan!
Have you tried printing without supports to save material?
I'm still learning Ben, but I believe you can print a model without supports but not a guide. The first few layers of printing are compressed and that could distort the guide but wouldn't matter with the base of a model.
On 6/7/2017 at 11:12 am, Brett Titensor said..."The implants are planned in the usual way, including setting D2 and choosing a CG2 sleeve. The CMG.DXD file is then exported in the same way as you would for milling a guide. Since I don't have inlab, I sent this file via dropbox to Frankie at AA Dental and in a day, he converted my file to a .STL file."
Question on the process... So you placed your implants in software, then exported the CMG.DXD file to Frankie, did he design the surigical guide for (window placement, etc.) then send it back as an STL file? For $20?
Brett, the cmg.dxd file does not have a design attached so Frankie did have to design it. I haven't received an invoice yet, but I'm pretty sure he said its around $20. I maybe wrong, but even if I design it, I think he would lose the design once he imported it into inlab. I'll have to ask him.
So the software that you need (adding supports etc) to go from Frankie's stl to printing is included with the printer?

Awesome Dan!
Are you going to give the Scorpion to Sam?!? Maybe print a rattlesnake too for him!!


I believe the Dental resin is FDA registered and does not have to be FDA approved since it is in the patient's mouth only temporarily.
Dan: Obviously you didn't design this guide but be very careful with this design during surgery. The printed resin is brittle and thin distal extension areas such as in this case will fracture easily with a little bit of downward pressure. Next time have Frankie max out the drill key support areas and increase the thickness (I choose a thicker parameter setting for printed guides vs. milled guides). Alternatively you can have Frankie mill your CG 2 on his MCX5 for cases like this or have SiCat design a digital guide, which you can then print. If SiCat sees issues with thin areas for printed guides that they can't correct in the design they will alert you to do an Optiguide instead (one of the advantages of working with SiCat in these type of cases).
Farhad
Actually you can print guides without supports. Some minor editing in Meshmixer and you should be good. However, like Farhad mentioned, they way this guide is designed is not good for printing without supports. If you have more flange to the guide you can easily print without supports. I'll try to post some examples.

Great advise Farhad. I normally would have learned by making it too thin and having it break during surgery. Glad to have your experience to avoid these problems.
Ben, I'd love to see some examples as I'm just learning the process. For those that don't know, meshmixer is a program that can edit a design or add a base to a model. Also a free program.
Use a second add-on software to print without supports to save $1 in material cost OR just print with the supports....Hmmmm let me think....
Farhad

You don treally need those machines to finish your prints. Just clean them with isopropanol 2 times 10 minutes and cure them in the scheu. Lc6 light oven for about 30 minutes
Works easy and models are very very neat

Great post, Dan! Looks like you're smitten with the 3D printer, too! Definitely agree that making your drill key supports larger will save you some intraoperative headaches. I started this workflow 8 or 9 months ago and found out the hard way!
The answers to many of the questions being asked can be found here:
https://www.cerecdoctors.com/discussion-boards/view/id/54482
I love this stuff
J
Thanks for posting the link Jeremy, lots of great info there!
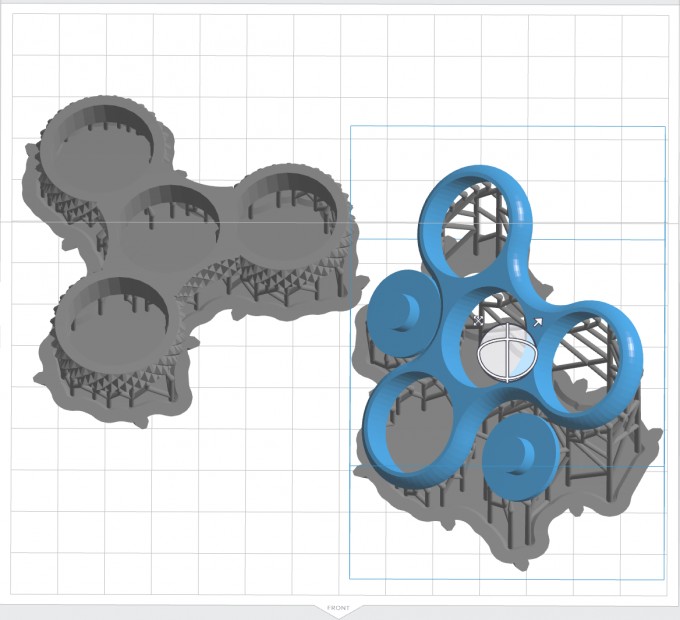
One warning.... be careful about telling your kids that you have a 3D printer. I now have about 12 hours queued in my printer for fidget spinners.


On 6/7/2017 at 12:49 pm, Daniel Butterman said... Great advise Farhad. I normally would have learned by making it too thin and having it break during surgery. Glad to have your experience to avoid these problems. Ben, I'd love to see some examples as I'm just learning the process. For those that don't know, meshmixer is a program that can edit a design or add a base to a model. Also a free program.
On 6/9/2017 at 8:30 pm, Javier Andrade said...takes a minute to do, is not that complicated ...
Did you just extrude one end in meshmixer and cut a flat plane? That looks like the easiest way that I can find.

I did a few printed guides on my FormLabs 2 using the SiCat design service. It costs more but I was initially a little uncomfortable with the stability and accuracy of the guides. After doing several cases, those concerns have been eliminated.
After last week's Level 6 course, I spoke to Jay Black at Winter Springs Dental Lab, and he will also do the design and send it back to you to print for around $20.
I use DropBox to send the files to him.
Until I get more experience with this workflow, I'm using it for the standard cases only. I'm still using SiCat for barium guides and larger cases.
On 6/10/2017 at 10:07 am, Daniel Butterman said...On 6/9/2017 at 8:30 pm, Javier Andrade said...takes a minute to do, is not that complicated ...
Did you just extrude one end in meshmixer and cut a flat plane? That looks like the easiest way that I can find.
Yes! Just extrude a piece on the base, after printed just cut it with a disc...
On 6/7/2017 at 10:17 am, Meena Barsoum said...Great workflow Dan, isn't printing cool!
Try using the DentalSG resin from FormLabs - it's FDA approved for surgical guides, but it does require some post curing with UV.
What do you use for post curing?
Formlabs is coming out with a wash and cure box, but I just bought a uv nail curing box on amazon for about $20.