Stuck between a Cerec and a hard case

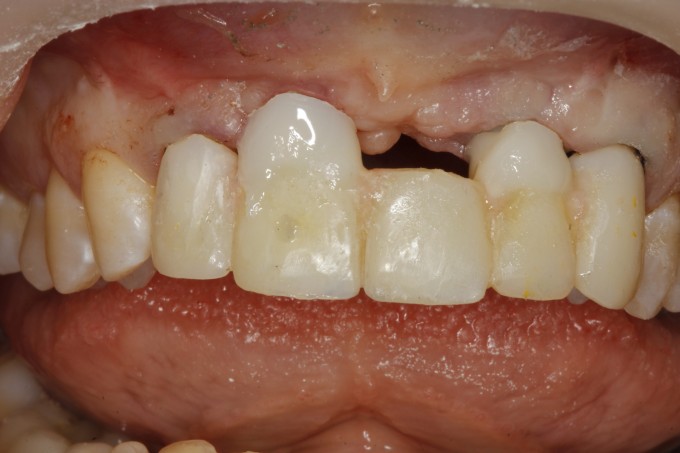
So this case ended up being one of the more difficult esthetic cases I've dealt with recently. The patient was referred by my periodontist after having teeth #8 and 9 extracted from beneath the existing bridge. So I came on board and started as usual with facially-generated treatment planning. Here are the pre-op photos...
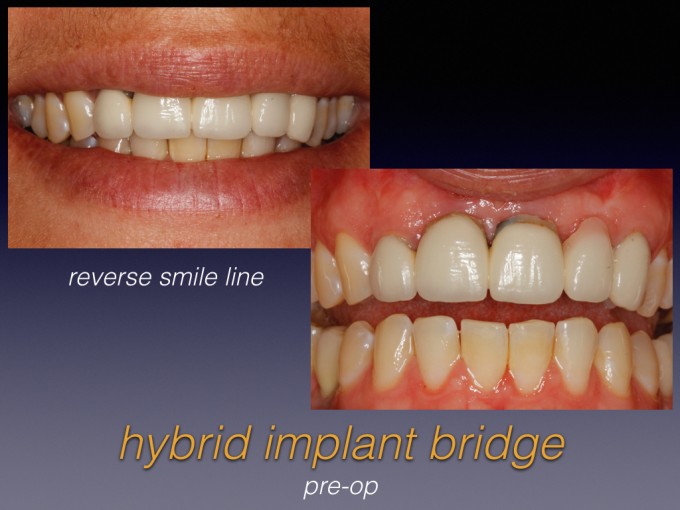
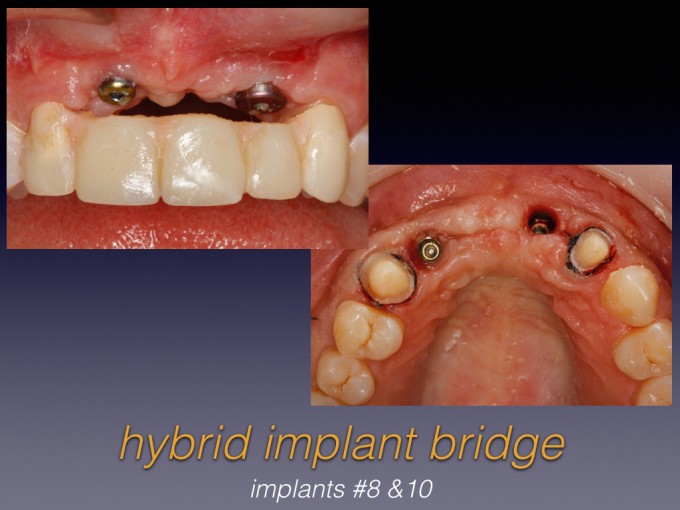
Clearly, we wanted to improve the reverse smile line and hide the pink ceramic transition beneath her lip line. We discussed further attempts at vertical grafting, but this likely would have brought the transition into view and actually make the case less esthetic. So here are my temps and the implants in sites #8 and 10 (placed by the referring periodontist)...

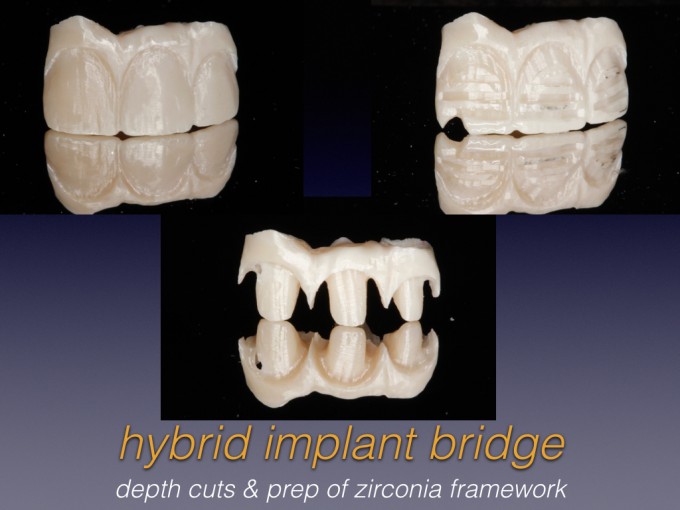
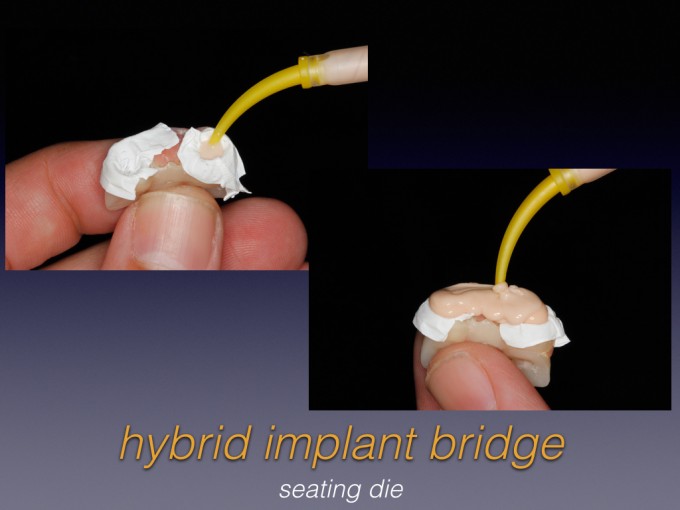
So I looked at doing the ceramics and number of ways, but ultimately decided to maximize my Cerec usage and push my technical limits. I first milled custom abutments and then biocopied the approved provisionals and milled a full-contour zirconia framework. Next, I used my depth cut burs to reduce the framework and refined the "preps" and "gingiva", taking care not to lose my reference points and keep ideal contours. Here are the photos of these steps...
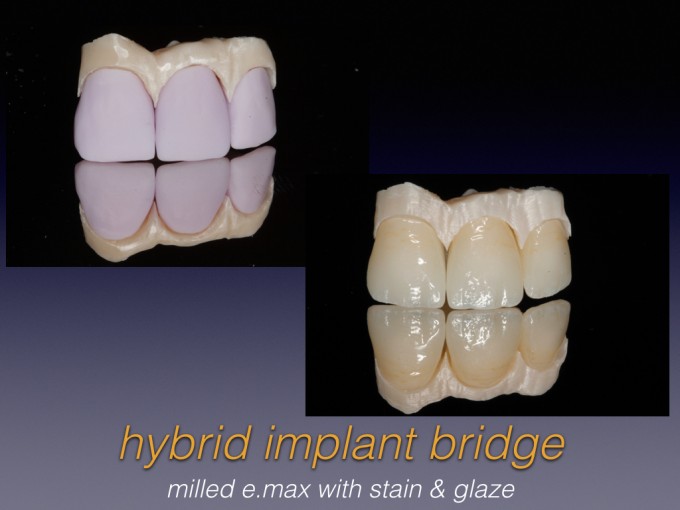
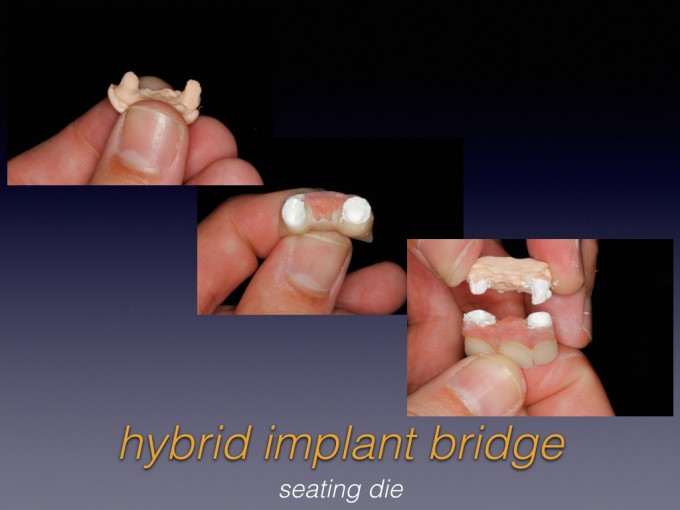
Once I had fully prepped the zirconia framework, I biocopied again to mill the individual crowns out of e.max Impulse. After a couple stain and glaze firings, it started to look like this...
Being happy with the esthetics so far, I then cut back the "gingiva" and layered with pink composite. Last, I bonded the e.max onto the framework, and this was the lab result...

Final intraoral photos will follow in a week or two. Has anyone tried something like this and what has been the long-term outcome? This is especialy pertinent as we want the ability to mill full-arch implant prostheses, but few have chairside experience with layering multiple materials.


Keep it up Ross. Your work is truly impressive. Why aren't you presenting at CEREC 30? The way you are going I would be surprised if you weren't at CEREC 35.
Aaron


Ross - Wonderful work! As my eyes moved down the line of photos, the more I became aware of how much I still need to learn.

Buddy,
You have way too much time on your hands, or you need to get out more. ![]()
Crazy good!!!!!

Looks great Ross. What are you going to do with #7 at the gum line. Are you going to add any pink there?
Also, did you prep the zirconia after sinter. That is usually not recommended due to potential phase shift
Amazing job though

Wow. I am impressed. That's a super-creative and awesome way of pushing the CEREC to the limits! I think I see a Skrammy version 2.0 in the works?

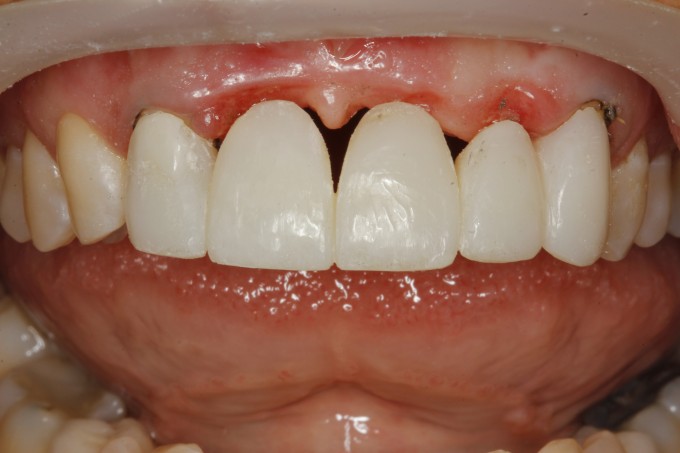
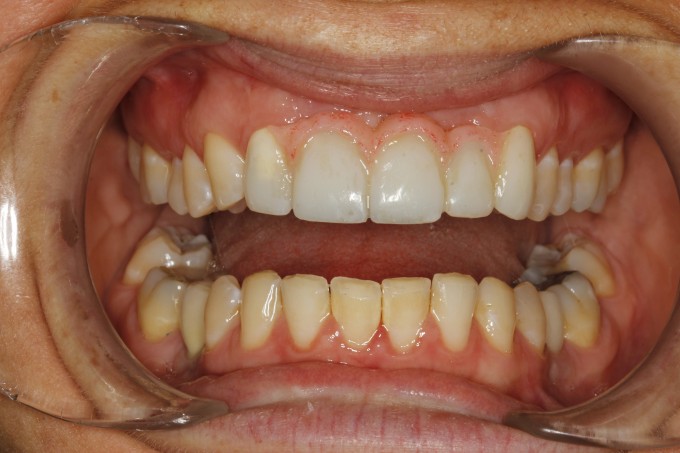
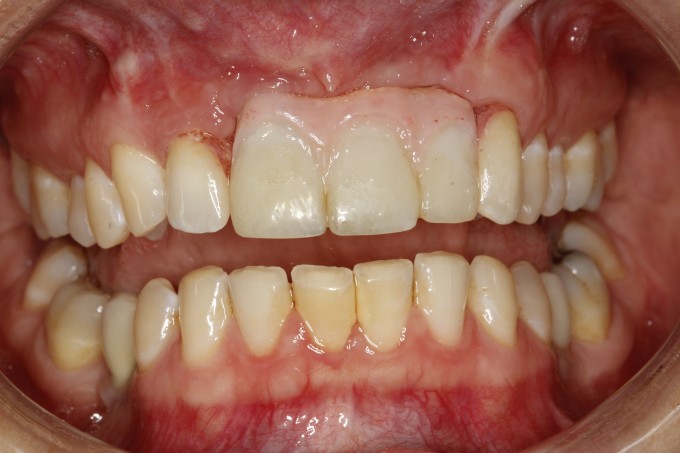
Thanks for the comments, guys. Of course, the true measuring stick is how it looks in the mouth, both in photos and in person. I delivered #6-11 last week and we think we are premilinarily very happy with the outcome, but I'm cautiously optimistic and I'll have final photos to share soon.
@Aaron and @John --- Thanks, but I'm just trying to keep up with this group of clinicians! I see innovative thinking every day on these boards and I draw inspiration from that.
@Ponzio - Your fish fetish makes ME uncomfortable![]()
@James - You are correct, sir...I need another hobby. You'll laugh, but I actually made two of these...that's how sick I am!
@Mike - I ideally wanted to prep the zirc in the green phase for obvious convenience reasons, but ultimately I didn't think I could control the cutback very well that way. And this case had some minimal thickness challenges, so I had to be spot on with my reduction. So, yes, I prepped it after sintering, then I ran it through a second sintering cycle before moving on. As usual, your eye is spot on regarding #7 (and #11, for that matter). I did address the need for pink there and you'll see what I did in the final photos.
Great. Glad you ran it through a healing cycle after prepping!!
Can you post more details of the design (or the case file itself) so people can understand your design. I hope the case turns out well. Flem must be halfway done with the email wanting an article on this ;)


Amazing stuff Ross! I can't wait to see the final pictures on this very challenging case! Raising the bar for all of us!
Congrats!

Beautiful work Ross... now you're just showing off. Truly impressive. Inspirational.
I'd only be concerned with the thinness of the framework in places after your cutback. I'm not a fan of introducing resin to a restoration like this (marginal staining, colour instability) but by all accounts nobody has shown they can produce pink ceramics that come near the aesthetics of the resins. The resin should be quite repairable in the mouth in any case.
Is there any way you can do this type of restoration as a split type without any need to prepare the zirconia by hand? Not sure if it's possible in the software?
As to the concept of Emax crowns cemented to zirconia framework... I think this is the optimal treatment at the minute. Great aesthetics and strength too.

Incredible case Ross! Thanks for pushing the boundaries of what's possible, very inspiring! Was Inlab used for the framework design? And what brand of gingival composites were used. I could see this approach used for full arch hybrid design, although would be very labor intensive. I always enjoy seeing your cases.

Ross,
What you did just blew my mind. Not that I have not seen cases like these done before but the ones I have seen were done by master ceramists.
For a dentist to do it inhouse is amazing.
More power to you. Wish you could show us step by step how you managed this monster of a case.

Ross,
I didn't even know that this was possible with Cerec...You are a true master. Couple of questions:
1.) Why was there so much bone loss after the extractions? Or was the bone loss already present pre-operatively?
2.) How did you make the provisional? Was it made with Cerec as well? It looks like it is not engaging the implants but is retained by #7 and #11?
3.) How did you remove the cement after cementing this onto the custom abutments?
Also: I agree with Damian that I am not a big fan of the pink composite either. Christian Coachman actually did pink composite on one of my patients and after a year it looked like wax in her mouth. Obviously it can be repaired but quite honestly I have seen nicer results with the Zirkonzahn pink ceramics in our hybrid cases as compared to the Gradia composite.
Farhad
I wonder if we could have pink zirconia as our base material and then just use some opaquer under Emax cement on crowns. I think that would give us some more reliable longterm aesthetics. The Zirc base could then just have a stain and glaze addition for capillaries, etc like we do with our crown and bridge work (non-layering).
Thanks for all the questions and I'm glad many of you immediately starting thinking about full arch implications like I have been.
@Damian -
1.) I am slightly concerned about the thin areas of the framework. The occlusion was tight and I didn't have a lot of bucco-lingual space to pull this off, but I think there's enough vertical and interproximal bulk of zirconia to allay those concerns.
2.) I also agree that ceramic would be ideal, but as you pointed out, the esthetics can be a nightmare. I still haven't figured out a way to photograph gingiva for predictable shade matching, so I'm hoping you will have some suggestions. It's so much easier to shade match intraorally with composite!
3.) As for split designing in the cutback, I don't think it's currently possible, but maybe we have an upgrade request on our hands here. I briefly considered Cad-on, but then I'd have to design the teeth as a bridge and the connectors would have been hideous. To my knowledge, that'd be the only way to bi-layer design this without doing the cutback by hand. Maybe Frankie or Jay has a trick up his sleeve that none of us know about?
4.) The zirconia was Luna D2, just because that's what I had left on the shelf after I did a trial run with Luna A2 (yes, I made two of these).
@James -
1.) Because I had to prep the abutments and then prep the framework, there was no advantage to designing in InLab. This was strictly Chairside.
2.) I layered 3 shades of Cosmedent's pink composite. Great handling and finishing microfill resin.
@Farhad - I knew you'd ask the tough questions!
1.) This case was referred to me after the extractions and it was grossly mishandled, IMO. From what I gathered, she had multiple sport-related traumas and had previously avulsed #10 and #8 and 9 were endo treated. The existing bridge went #7-11, for splinting puproses, I assume. Later on, #8 and 9 developed resoption and for some idiotic reason, they were extracted from a buccal approach with the existing bridge left in place. I guess the bridge looked so nice, they didn't want to disturb it.![]() Anyway, by the time she got to me, there was already a hard and soft tissue deficiency #8-10 and the implants were planned to go in...so I had to put the brakes on the case and start planning it correctly. That's where the FGTP template came in. The existing bridge was way too short incisally and the gingival transition had been placed too far apically. Classic mistake of treatment planning and making ceramic decisions looking at a cast/model without the lips and smile as a frame of reference... and obviously no prototype provisional. To correct those errors, I lengthened the incisal edge, elongated the incisors to 9.5mm, and moved the "gingiva" about 2mm coronally. The "gingiva" shift is in part resposible for making it look like there's more bone loss from my pre-op photo (which was still months post-extraction) to my post-op picture. It's really due to me moving the teeth relative to the ridge. Hope that makes sense.
Anyway, by the time she got to me, there was already a hard and soft tissue deficiency #8-10 and the implants were planned to go in...so I had to put the brakes on the case and start planning it correctly. That's where the FGTP template came in. The existing bridge was way too short incisally and the gingival transition had been placed too far apically. Classic mistake of treatment planning and making ceramic decisions looking at a cast/model without the lips and smile as a frame of reference... and obviously no prototype provisional. To correct those errors, I lengthened the incisal edge, elongated the incisors to 9.5mm, and moved the "gingiva" about 2mm coronally. The "gingiva" shift is in part resposible for making it look like there's more bone loss from my pre-op photo (which was still months post-extraction) to my post-op picture. It's really due to me moving the teeth relative to the ridge. Hope that makes sense.
2.) I did not use Cerec to mill the provisional, but now I wish I had. I did a wax-up first, then copied to the mouth via putty matrix. The we fine-tuned the incisal length, adjusted the lower incisors to accomodate the new occlusion, and dialed in the gingival contours and pink resin on the temps. Because everything was in flux and I knew I'd have to reline the temps a couple times, I elected to use Bisacryl beacuse it is much easier to modify than milled acrylic. Realize that I only showed a fraction of the temp photos. i can post more if people want to see how I transitioned from a tooth-supported bridge #7-11 while the implants were being planned/placed to the implant-supported temp with temp abutments. I just didn't want to dive too deep and overwhelm the presentation.
3.) Regarding, excess sub-G cement...this was a big concern for me, as I knew she was going to want wings of composite to hide the transitions. So I did a few things to reduce the risk of residual cement: a.) I designed the abutments with a high lingual margin so I could mechanically access interproximally (still not easy access). b.) I placed cord on the abutments before cementing; but instead of placing one long cord circumferentiallty, I placed a half-length cord on the facial and a second on the palatal. That way I can drag cement in two separate directions instead of pulling it all through interproximally like happens when you use one long cord. c.) I placed Vaseline on the entaglio of the bridge to discourage the cement from sticking to it. d.) For implants, I make a custom cement die that helps my assistant load the implant restoration with the correct amount of cement without overloading and hydraulically forcing cement sub-G. Also, when possible, I don't seal composite over my teflon tape so that there is some kind of internal "vent" on the abutment. e.) I placed the last of the composite "wings" intraorally AFTER I seated the bridge. I had total access to #8 and decent access to #10, but admittedly not perfect access. Again, I can post more on this if people are interested or unfamiliar with these concepts.
On 7/28/2015 at 6:18 am, Ross Enfinger said...Again, I can post more on this if people are interested or unfamiliar with these concepts.
Yes, please...the more the merrier!
On 7/28/2015 at 8:46 am, Aaron Wulff said...On 7/28/2015 at 6:18 am, Ross Enfinger said...Again, I can post more on this if people are interested or unfamiliar with these concepts.
Yes, please...the more the merrier!
Aaron, hopefully these tell the story....

Ross-
If you wanted to use porcelain, try the pink GC ZR-FS. All you have to do is get it close and then you can use the new Lustre Paste Gum over the top to refine.
When using composite, Anaxgum tends to work better I think... but what every you use, make sure you seal it with somethink like Optiglaze. It will look better, longer.

This case is ridiculously impressive and challenging! Thank you for documenting and sharing it with us. There are so many neat ideas/tricks with this case. Looking forward to seeing the follow up photos.
JG
Regarding full arch cases and the idea of heading in that direction... Probably needs a whole new thread.
I did attempt to manufacture an all-on-4 about 18 months ago, but gave up in the end as I felt as though I was doing the patient a disservice. The limitations I found were size of the blocks. One sintered size is allowed for the maxi block would get my structure in ok, but it was a lower on a small lady and only had 10 teeth. Anything bigger or on the upper and I would not of stood a chance of fitting it in.
Accuracy was ok, but using bluecam it was probably not quite good enough for peace of mind
Componentry did me in in the end. I really wanted to be screw retained, but the surgeon must have dug into his emergency bag that day and come up with a rarely used implant for all on 4's. Perhaps the normal implant size just wasn't working that day? So that meant I couldn't realign a distal implant with abutments. If you were planning to manufacture all on 4s then something to keep in mind too. I prefer screw retained , so if you use the right implants placed guided and hence have full control I'm sure it'd work. You might still need to convert single tooth tiBases into non-engaging by removing hexes or similar - prob not ideal.
Using pink ceramic would be much easier on a full arch as there's not the pressure to match closely to natural gingiva. No tips about pink ceramic other than experience. Perhaps try quick trial matching when you have extra time on your hands for patients where you're getting them back for something else next week? A few minutes in the lab here and there's not a lot of time to spend.

You F#@$^%@^%#ing amaze me Dude! Absolutely some of the best "outside the box" thinking I've seen in my lifetime. Thank you for sharing and documenting for us mortals to the dental world how amazing dentistry can be performed by the 1%. WOW!
Ross,
Thanks for the detailed answers to the questions. You are a prime example of someone who has combined SPEAR and CEREC to provide exsceptional dentistry.
I would encourage everyone to follow in Ross' footsteps and go through the SPEAR curriculum in addition to the CEREC curriculum...By combining the two you will be able to deliver the same kind of high-end dentistry.
BTW: If you want to do this kind of work for full-arch cases in-house then don't bother with the Chairside software and the MCXL....Get the inLab 15 software (once it is released) and the inLab MC X5 mill.
Farhad
A couple of further thoughts Ross...
I havent explored CAD-on in the software since I bought the kit and relegated it to the back of the cupboard. Could you possibly have used the Cad-on calculation for the zirconia, but forget about milling the Emax section? This might give instant virtual reduction for the bridge, but you could then just scan the zirconia section you mill and sinter for individual Emax crowns, forgetting the bridge section.
How about prestaining the zirconia with pink before sintering to give an easy boost along for the pink resin (or ceramic) additions. I wonder how good we could get a pink stained zirconia base full contour to only have to add some ceramic stain and glaze over it. There's a few stain options out there for pinks. ( Aquarell, acid bath solutions, etc)


I've gotten a couple messages asking about the process of converting from the tooth supported provisional bridge to the implant-supported temp bridge, so I'm going to do my best to cover it. Just to step back a bit, at the very beginning of the process I first needed to communicate to the patient and the periodontist what the pink ceramic design would look like so we could decide whether to attempt further soft tissue augmentation. Ultimately we decided against it. Here is the original tooth-supported bridge design #7-11 and the photo that really convinced us to not graft any further:
Of course, the embrasures were just to see how "pink deficient" we were, so I then added pink to it. Again, this provisional was essentially for communication purposes and setting patient expectations, which is key in a case as esthetically dicey as this one. Here is the pink-layered temp:
From there, the periodontist placed the implants and I adjusted the tooth supported temp to stay off the soft tissue. She looked pretty bad for a while:

Then I was ready to convert to the implant-supported temp bridge on the provisional abutments #8 and 10. First, I opened up the palatal of the tooth-supported bridge so I could reline it over the temp abutments:

Next I used Bisacryl to "pick up" the abutment reline:
Then I polished and added pink:

And finally, I sectioned the natural teeth #7 and 11 off of the bridge and milled individual crowns for them. This left the bridge implant-supported with the implants in sites #8 and 10:

Ross, That is really amazing. As Farhad had said I can see the Spear concepts in all the cases you do. The process to put this together was very innovative and so well thought out. I am looking forward to seeing the end result.

Ross - Amazing work my firend!!! Great thread as well -
Question - why not make this screw retained? What am I missing here?
Thx Greg

Was so relieved to finish this case that I forgot to post the finals. Thanks for reminding me, Carrie.


Ross,
OMG thanks for helping with my patient. PM me whatever you need! Long term great patient want to help her, that's why I posted! You rock!
Carrie