Importance of texture

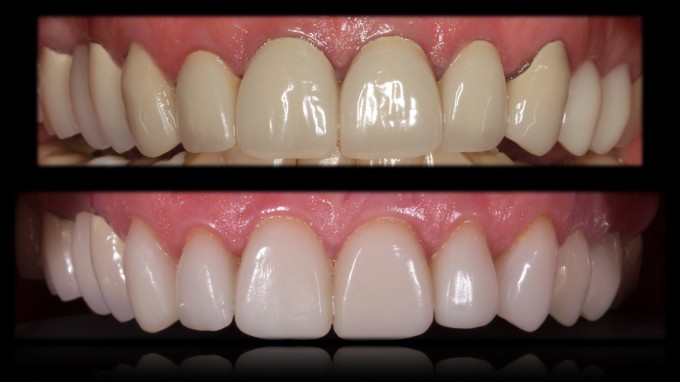
Here is a case that I did out of Impulse V1 and e.max LT A1. Crowns on #6,7,8,9,10,11 (V1), crown on 13 and custom abutment and crown on #12 (e.max LT A1)
It was a great case to do and patient was beyond thrilled. It's amazing by getting better proportions and using a more natural porcelain how you can totally transform the smile and patient's esteem. She is beyond thrilled.
However.... as i'm reviewing the case, I noticed that #9 is lower value than #8. The material was the same, porcelain thickness is the same, and stump shades were all the same. The difference is the lack of texture on #9. Light is bouncing off in a different way. I don't know what happened exactly and i'm sure if I shot it with a ring flash it would look better (the reason I use twin flashes...). It's not redo bad... but it's eye opening to make sure you have the texture symmetrical when doing centrals. The laterals are off too... but they were super difficult due to spacing concerns and i'm telling myself that the these little imperfections make a case look more natural ![]()
You also can see the difference in brightness between e.max LT A1 and Impulse V1... highlights the advantage for sure!

Great job and beautiful result! I like the "grind-zone" characterization you put in using the handpiece --- gives the allusion of the teeth appearing narrower than they did before. Couple of questions:
1) Did you pre-polish these Emax restorations prior to firing?
2) If so, did you also use stains and glaze?
Hi john
I do quite a bit of prepolishing in a certain way during and after contouring. On this case there is very little color and a very thin amount of glaze.
If you are going to be in Vegas, I will be showing my technique start to finish from design to seat. Have video of it all.

Could you have been closer in value on crowns 12 and 13 with BL3 or BL4 e.max to the V1 anteriors? I bought the GC Lustre Paste kit last week for e.max as a result of seeing what you were able to do with it. The colors are very stable pre and post fire. Awsome. Looking forward to Vegas and your video presentation.

Truly amazing! Extremely lifelike look. Your patient looks like she has a natural beautiful smile.

Wow Mike! This is a beautiful smile . Excellent dentistry. You have me pumped to hear about some of these cases at C30.
Thanks for sharing,
Justin
On 8/12/2015 at 5:28 pm, Charles Sannar said...Could you have been closer in value on crowns 12 and 13 with BL3 or BL4 e.max to the V1 anteriors? I bought the GC Lustre Paste kit last week for e.max as a result of seeing what you were able to do with it. The colors are very stable pre and post fire. Awsome. Looking forward to Vegas and your video presentation.
I think that B1 LT would have matched better. I obviously wished I would have done them in V1 as well!
I had no idea that she was going to want to do the anterior teeth until I already finished 12 and 13. I guess that provided her motivation to complete the smile that she hated for so long!
Lustre Paste is the real deal. That is all that I use on anteriors. In Vegas I will only have time to do a single central incisor, but I will show how to contour it, how to prepolish, what Lustre pastes to use and how to apply them, and how to finish after the firing. Hopefully that will be helpful to you all. I'm going to do more of a complex staining job in the example, but not all the teeth need this. The more teeth that you do, the less color you really need to add if that makes sense. It's when you have to match existing teeth that it gets a little hairy :)
I nitpick on this case, but you all are right... as a total smile, it looks great...
As an aside, I review a lot of my cases with Bill Marais (including this one) and he gave me another great tip that I never thought of... if you rough up the lingual a little bit (toward the incisal), it will actually bounce more light and increase perceived value. I could have used this on #9 since it got greyed out a bit due to the lack of proper facial texture.
On 8/12/2015 at 5:08 pm, Mike Skramstad (Faculty) said... Hi john I do quite a bit of prepolishing in a certain way during and after contouring. On this case there is very little color and a very thin amount of glaze. If you are going to be in Vegas, I will be showing my technique start to finish from design to seat. Have video of it all.
For those of us who can't make it to Vegas, please post that video afterwards. Pretty please. Thanks!


Maybe it's the lighting on the photo but the crowns look on the grey side.
Obviously the shape of these teeth is awesome. The buccal of the centrals look flat. I like to see a little anatomy to break up the light reflection.
Please don't take this wrong. I'm sure the patient looks great. It's just when you take close up photos it doesn't always appear the same as a "normal" distance appearance.

On 8/13/2015 at 12:11 pm, Mike McKinley said...Maybe it's the lighting on the photo but the crowns look on the grey side.
Obviously the shape of these teeth is awesome. The buccal of the centrals look flat. I like to see a little anatomy to break up the light reflection.
Please don't take this wrong. I'm sure the patient looks great. It's just when you take close up photos it doesn't always appear the same as a "normal" distance appearance.
This brings up a good point Mike... lighting and photography.
The only tooth in the mouth that is slightly lower value is #9 and that has to do with how the light is being broken up in the incial 1/3... The porcelain is not grey.. but it's perceived as lower value because of light reflection.
I would be willing to guess that most of you shoot all your photography with a standard Macro lense and ring flash. This is super easy and effective, but you are not getting the true "picture" of what is going on when you use that in the anterior. It concentrates the light on the central incisors and overexposes them significantly. This not only affects the way it looks, but also color.
In order to take "true" photography in the anterior, you have to use twin flashes and even better, twin flashes with extenders and pocket bouncers.
So let's look at the final with two different systems:
Here is the two week post op image shot with a ring flash/macro lense. The central (#9) specifically) does not look as low value because the ring flash put too much light on it. It also underexposed the true light on the laterals... The tissue is not the right "hue either"... overexposed

Now if you look at the final picture with the twin flash on extenders with pocket bouncers...looks totally different (and in fact correct). This represents a more true picture of what is happening in the mouth.

Exactly the same concept of what professional photographers do with their big umbrella diffusers and bouncers... so the lighting is correct and doesn't cast weird shadows.
Another example...
Ring Flash:

No Ring Flash

Also... If you are trying to communicate the true texture of a central incisor to the lab... very hard to do with the light is bouncing all over it. This is what i'm looking for:

Isn't it possible to add texture after cementing?
i mean, I know it is possible, but would it look good?
Sure it's possible. But you have to notice the issue first. The other problem is it's hard to recreate a final finish that matches the other restorations

Mike, a coouple of thoughts regarding the first set of sample photos. You said the gingiva is overexposed with the ring flash, yet to my eye the tissue is not only a slightly different hue, but also more saturated. Typically to get greater saturation one will *underexpose*, so I am not sure of the physics of that difference. Can you explain why it looks darker yet be overexposed?
The second thing I notice is the bridge abutments on the right shows the commonly seen problem of the opaque layer showing through near the margin. The ring flash picture looks more like what we all see clinically every day, but may actually be accentuating it, while the twin flash almost seems to mask that defect. I am curious which reflects the clinical presentation of those teeth better.

Nice case Mike and lots of great points. I know you spend a lot of time contouring and creating the surface texture before staining and glazing your crowns. I have read some info about sandblasting the crowns/veneers before using the GC lustre paste. Is this something you do?
Additionally, I find it difficult if I need to add a lot of extra color, whether it be gingival stain, white, translucency that sometimes my surface texture gets a little lost with the application of the stain and glaze. Any tips?
On 8/13/2015 at 4:14 pm, Gary Templeman said...Mike, a coouple of thoughts regarding the first set of sample photos. You said the gingiva is overexposed with the ring flash, yet to my eye the tissue is not only a slightly different hue, but also more saturated. Typically to get greater saturation one will *underexpose*, so I am not sure of the physics of that difference. Can you explain why it looks darker yet be overexposed?
The second thing I notice is the bridge abutments on the right shows the commonly seen problem of the opaque layer showing through near the margin. The ring flash picture looks more like what we all see clinically every day, but may actually be accentuating it, while the twin flash almost seems to mask that defect. I am curious which reflects the clinical presentation of those teeth better.
Hi Gary-
You know a ton about photography, so obviously your eye is correct. I should not have said the gingival was overexposed, because it likely was not. I was concentrating more on how the teeth get way overexposed with the ring flash (obvious). The change in hue (and the bridge) more has to do with how I controlled the light to be more artistic. There is not that much light at all getting to the posterior because I have the flashes extended very far away and the pocket boucers purposely creating a shadow back there. When put on a black background, sometimes it is too dark, so that is me increasing the exposure of the raw photo just a little in lightroom. I'm sure that makes more sense to you.
I will convert the raw photo and post that and you will see that the hue of the tisssue is much closer.
Here is the setup that I use. I can get a lot more light by pushing the flashes in and back.

This would be the twin flashes without the extender and right next to the camera..much more light

This is fully extended and smaller frame with the pocketbouncers.... just more artistic and kind of a fun picture

Clinically, extending about half way and allowing more light with bouncer (indirect light) is probably the best photo
On 8/13/2015 at 4:35 pm, Daniel Wilson said...Nice case Mike and lots of great points. I know you spend a lot of time contouring and creating the surface texture before staining and glazing your crowns. I have read some info about sandblasting the crowns/veneers before using the GC lustre paste. Is this something you do?
Additionally, I find it difficult if I need to add a lot of extra color, whether it be gingival stain, white, translucency that sometimes my surface texture gets a little lost with the application of the stain and glaze. Any tips?
I don't sandblast, but I use Diashine Course to decrease the surface tension. Does the same thing as sandblasting
You need to use horizontal brush strokes, not vertical to prevent the second point.


What a great, informative post for all of us! Thanks for sharing and showing off the great shaping of those teeth. Did you work off a waxup or just use the overcontoured originals and add your "grind zone" and surface texture touches?
Thanks Mike, I can begin to finally see what you guys have been saying all along about the ring flash. Better late than never.

Back to the GC Lustre Pastes. I watched some of the videos online and looks like an important aspect of creating lifelike anteriors with milled ceramic. When I order a kit like that I generally over order and spend $ on shades I never use. Can u suggest what I should get for most frequent use and intro to their use?