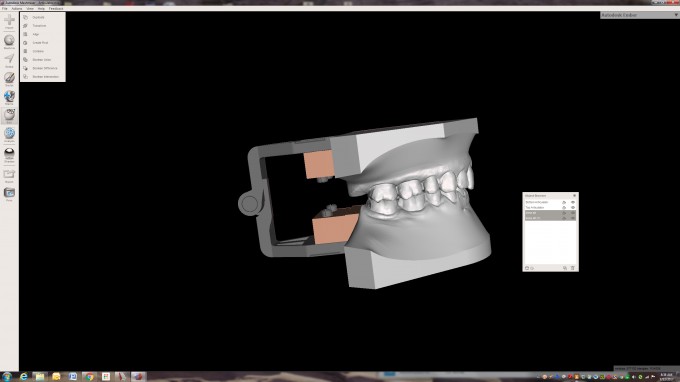
stl export is a game changer for anteriors

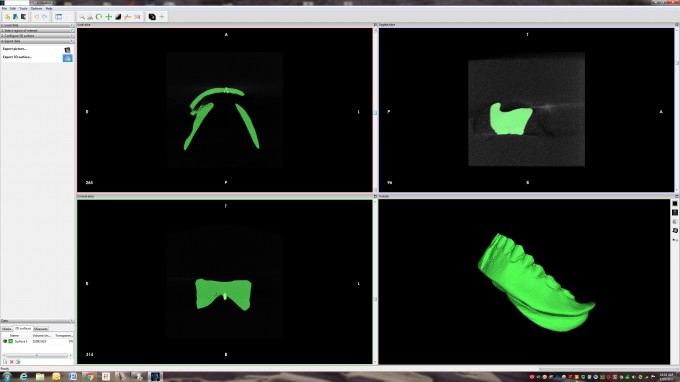
I had the opportunity to try out the .STL export function in software 4.5.
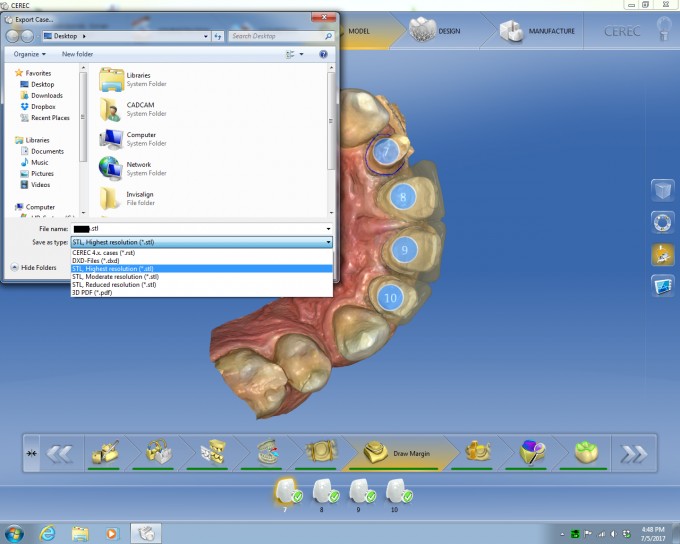
Under the export tab, I selected highest resolution.
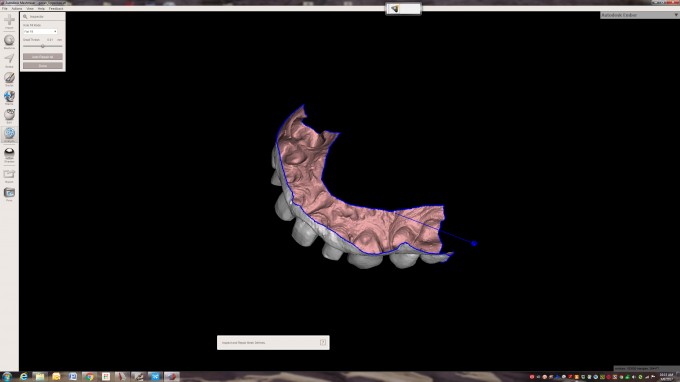
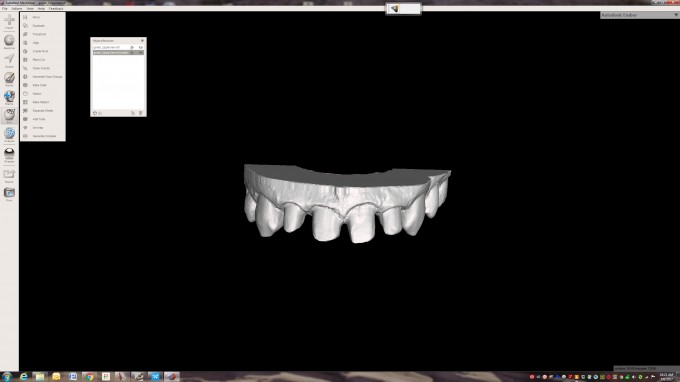
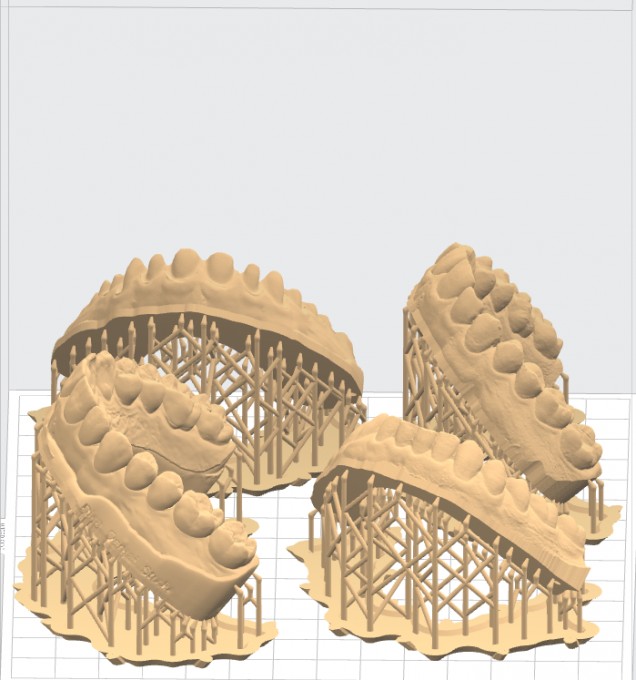
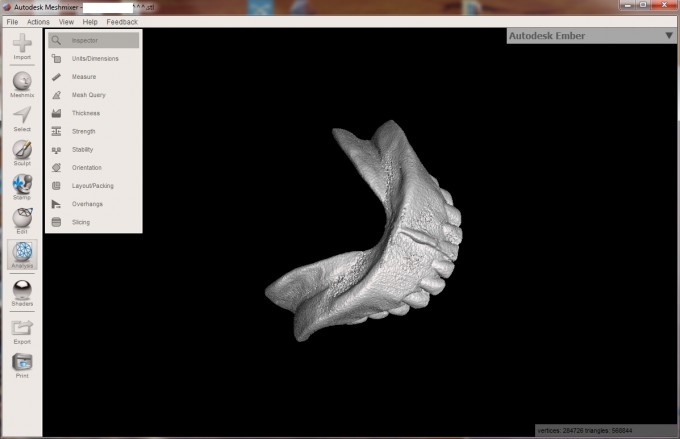
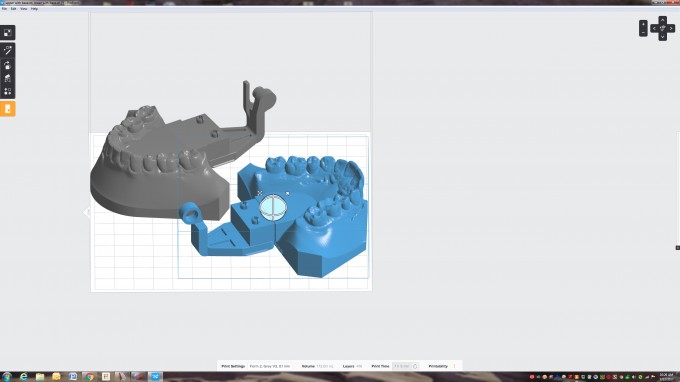
From here, I imported the file into Meshmixer. A model .STL for CEREC chairside does not have a base, it's just a shell, so any holes in the model have to be closed and a base added... this is easily done in Meshmixer.
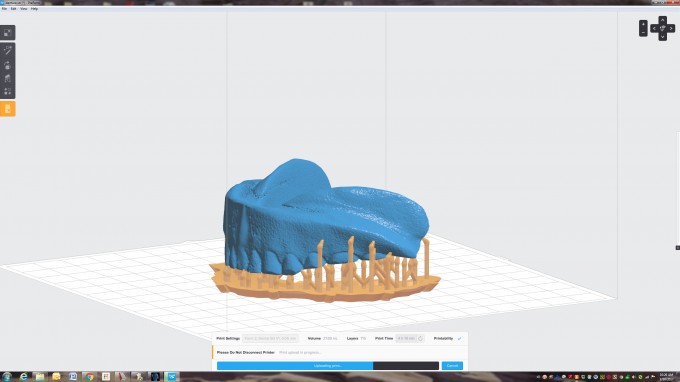
The .STL file is then imported into Preform software for adding supports and printing.
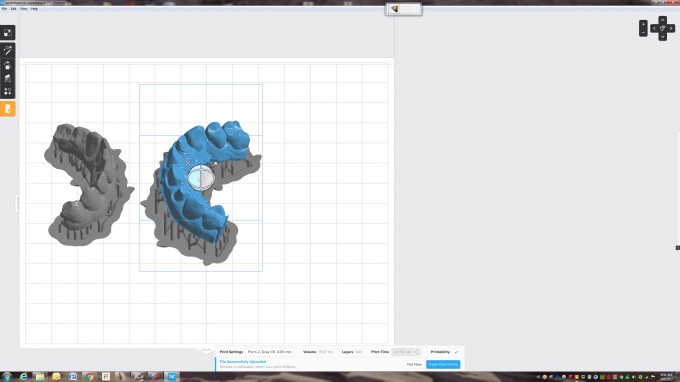
Technically, you should use Dental Model resin to print these, but I had gray already loaded and wasn't concerned about checking the margin accuracy as I wanted the model only to help with contouring.
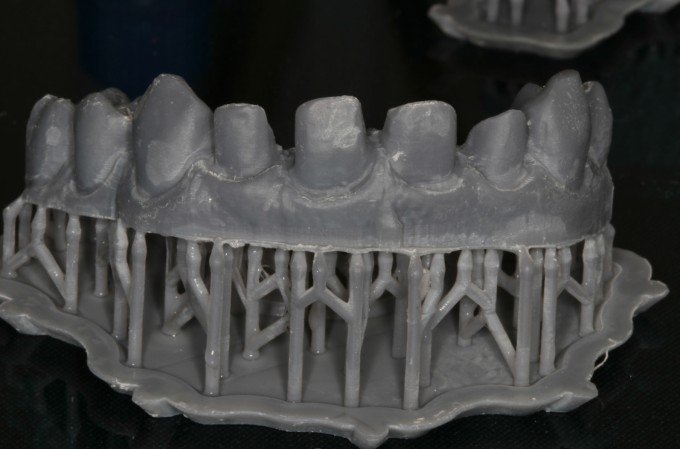
It's really a bigger advantage then I realized to be able to look at the incisal edges and contours on a model. People like Kris and Ross can do this stuff with their eyes closed, but I need every bit of help I can get.
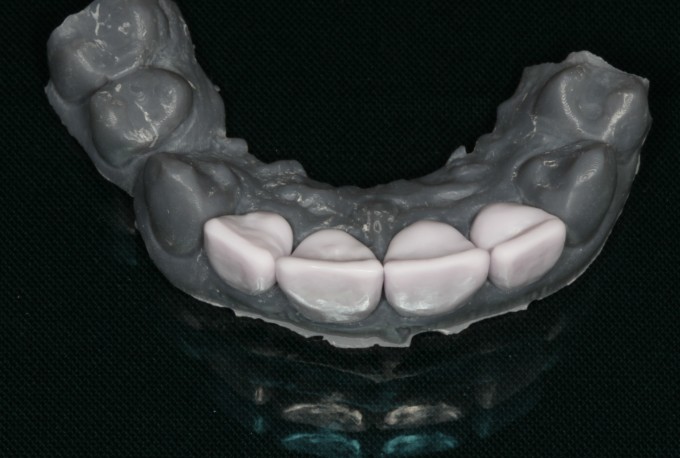

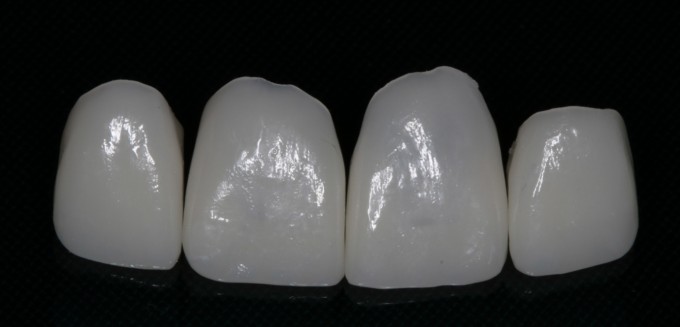
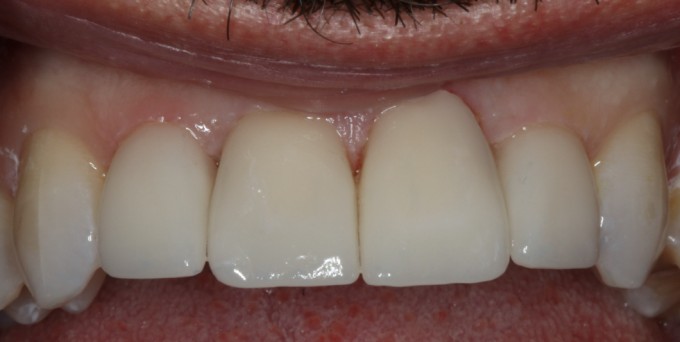
Immediate post op. Pt. was happy and I had much less intra oral adjusting to do.


Explain the steps....did you export to inlab or can you go directly to formlab2 .......you have me watching now .....lol....after i typed this the rest of your info came up.....lol thanks!!!!!!!

On 7/10/2017 at 6:33 pm, Danny Mcneil said...how do you export the .stl for the model? thank you, DANNY
Once you have 4.5 installed you can make a request to get the license for STL export. In the US it is through PTC, not sure if you have a different path
On 7/10/2017 at 6:36 pm, Gene Messenger said...Explain the steps....did you export to inlab or can you go directly to formlab2 .......you have me watching now .....lol
Gene
Once you have created a model in Cerec and acquired the STL license you export the STL ( 3 details available) Import this into meshmixer ( Shareware available @ Meshmixer.com
This software can be used to modify or more important analyze the model for defects which could lead to failed prints.
Export this after analyzing and repairing to desktop and bring this into the printing software( preform)
The model will then be printed out on the formlab2 printer
On 7/10/2017 at 6:39 pm, Gene Messenger said...Pete do you just call?
After you have loaded 4.5 call PTC and they will process the license
Rich,
i think it took around 2 1/2 hours to print the upper and lower model.
Like Pete said, just call PTC after you have 4.5 and request the export license.

Yes Daniel or anyone else how long for print time say only single UA model ? Time difference for grey vs model resin?
Open on MeshMixer Ctrl+A (select all) > B (smooth boundary) > Extrude > 10 (maxilla) or -10 (mandible) < Y Axis < Flat < Accept > Ctrl+E (Export) Open in PreForm and print without supports, or with. Your call. Done
On 7/10/2017 at 6:50 pm, Dave Rossen said...Just over an hour without supports on 100micron Z-axis for Grey. Model resin is only for showing patients or if you want a closer to natural color for lab work. Edit: Mike just reminded me that we're talking about dies. My brain is a little stuck in aligner ortho models. For that, 100 µm is perfect, but for dies we should probably be sticking with 50 µm. Therefore, the print time will be roughly double. Likely 2 1/2 to 3 hours minimum.Yes Daniel or anyone else how long for print time say only single UA model ? Time difference for grey vs model resin?
On 7/10/2017 at 6:51 pm, Baron Grutter said... Open on MeshMixer Ctrl+A (select all) > B (optimize boundary) > Extrude > 10 (maxilla) or -10 (mandible) < Y Axis < Flat < Accept > Ctrl+E (Export) Open in PreForm and print without supports, or with. Your call. Done
Edit: Mike just reminded me that we're talking about dies. My brain is a little stuck in aligner ortho models. For that, 100 µm is perfect, but for dies we should probably be sticking with 50 µm. Therefore, the print time will be roughly double. Likely 2 1/2 to 3 hours minimum.

Yeah... time is going to depend on what resin you use, what orientation you print at, what supports you use and what resin you use. I generally print models at 50 microns and use the model resin. I find the texture to be much better than the grey. Seems to be more accurate to me. However, it also takes longer. I also have been printing stuff for my anterior work at 45 degrees because you get less lines in the facial surface of the anterior teeth. However, I printed 4 models on these settings today and the print time was (is... it's still going) 11 hours.
Gene you'll need 4 licenses, much like Cerec licenses are for software - they load onto the dongles.

Gene, they should know you have four cameras, and will send you four licenses. I emphasis should, this is how it worked for me. In reality, you only need one to export if you have a way of easily moving files around your network. I have a workstation in consult room with two folders: one is called .ssi exports from omnicam, the other is called guides from sidexis. They are shared to the desktops of my bluecam, omnicam, and the workstation on my office. I will be creating another one called .stl files. That way I do not have to mess with data keys or Dropbox. As everything is on local files in my network, it is very fast. Plus no potential hippa risk.
On 7/10/2017 at 6:51 pm, Baron Grutter said...Open on MeshMixer Ctrl+A (select all) > B (smooth boundary) > Extrude > 10 (maxilla) or -10 (mandible) < Y Axis < Flat < Accept > Ctrl+E (Export) Open in PreForm and print without supports, or with. Your call. Done
On 7/10/2017 at 10:03 pm, Marc Thomas said...On 7/10/2017 at 6:51 pm, Baron Grutter said...Open on MeshMixer Ctrl+A (select all) > B (smooth boundary) > Extrude > 10 (maxilla) or -10 (mandible) < Y Axis < Flat < Accept > Ctrl+E (Export) Open in PreForm and print without supports, or with. Your call. Done

I have been a little slow on the 3d printing but I'm interested now. Is there a consensus on the best printer?
Not to be my usual luddite self but if you just want the model to put the crowns on for some final contouring and not concerned about perfect accuracy, why not just take a quick impression and pour it up? Don't need to pack cord or anything, don't need a printer for that and won't take 2-3 hours. I know, IMPRESSIONS?! CAN'T DO THAT! but sure seems a lot easier, quicker and cheaper. I do see other uses for printed models but not for what the original post was about. Am I missing something?

On 7/11/2017 at 9:57 am, Greg Zlock said...Not to be my usual luddite self but if you just want the model to put the crowns on for some final contouring and not concerned about perfect accuracy, why not just take a quick impression and pour it up? Don't need to pack cord or anything, don't need a printer for that and won't take 2-3 hours. I know, IMPRESSIONS?! CAN'T DO THAT! but sure seems a lot easier, quicker and cheaper. I do see other uses for printed models but not for what the original post was about. Am I missing something?
you arent missing anything but no goop is a good thing. :)
No.... he's missing a few things. Specifically making the waxup process easier (even with a lab tech). I work entirely digitally with a lab if you have 3D printing! There are Ortho Applications, you can make all your splints digitally, there are just a tons of things you can do.

Any you have already taking the impression with the cerec. Its not too hard to print the model.
On 7/11/2017 at 10:15 am, Mike Skramstad said...No.... he's missing a few things. Specifically making the waxup process easier (even with a lab tech). I work entirely digitally with a lab if you have 3D printing! There are Ortho Applications, you can make all your splints digitally, there are just a tons of things you can do.
I agree with you completely. I was just referring to having a model to adjust your contours. I think that is what Gregg was asking about.
On 7/11/2017 at 9:57 am, Greg Zlock said...Not to be my usual luddite self but if you just want the model to put the crowns on for some final contouring and not concerned about perfect accuracy, why not just take a quick impression and pour it up? Don't need to pack cord or anything, don't need a printer for that and won't take 2-3 hours. I know, IMPRESSIONS?! CAN'T DO THAT! but sure seems a lot easier, quicker and cheaper. I do see other uses for printed models but not for what the original post was about. Am I missing something?
Greg,
For sure there are analogue ways to do all of these, even sending the crowns to a lab if you like, but this just demonstrates another useful fully digital way to use a printer. Would I buy one just for this alone? Probably not, but as Mike alluded to, things are moving fast in the digital world and I believe a 3D printer will be an important part of that.
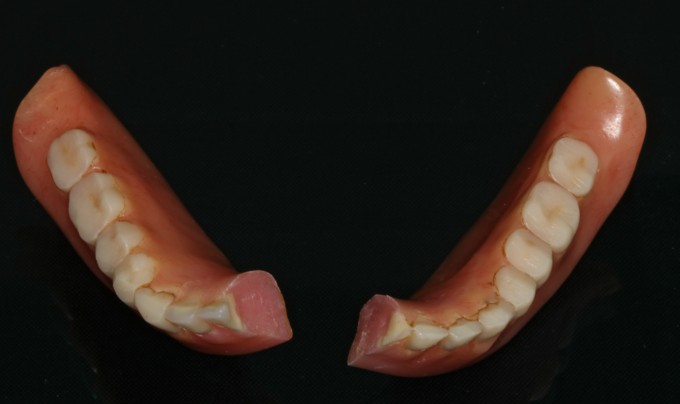
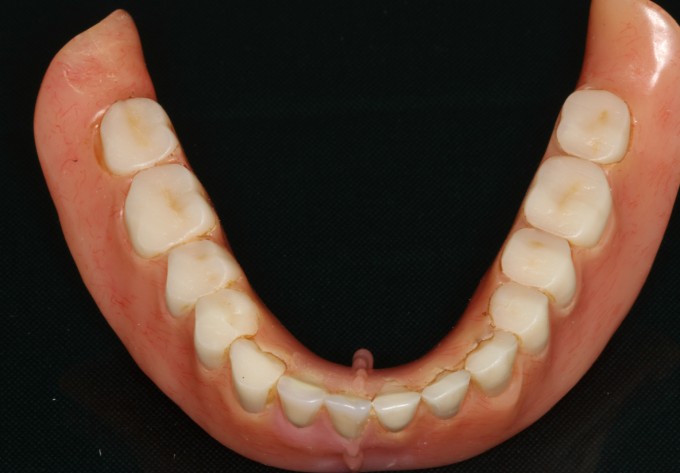
Once you get comfortable with one, it's amazing how many uses you'll find for it. This patient came in with a broken lower denture that she needed to replace and wanted the new one exactly the same. I temporarily repaired it for her and printed an identical one to take a final impression with the exact jaw relations. Could I do it with an analogue way? You bet, but this was more fun and more accurate.

On 7/11/2017 at 10:43 am, Daniel Butterman said...On 7/11/2017 at 9:57 am, Greg Zlock said...Not to be my usual luddite self but if you just want the model to put the crowns on for some final contouring and not concerned about perfect accuracy, why not just take a quick impression and pour it up? Don't need to pack cord or anything, don't need a printer for that and won't take 2-3 hours. I know, IMPRESSIONS?! CAN'T DO THAT! but sure seems a lot easier, quicker and cheaper. I do see other uses for printed models but not for what the original post was about. Am I missing something?
Greg,
For sure there are analogue ways to do all of these, even sending the crowns to a lab if you like, but this just demonstrates another useful fully digital way to use a printer. Would I buy one just for this alone? Probably not, but as Mike alluded to, things are moving fast in the digital world and I believe a 3D printer will be an important part of that.
Once you get comfortable with one, it's amazing how many uses you'll find for it. This patient came in with a broken lower denture that she needed to replace and wanted the new one exactly the same. I temporarily repaired it for her and printed an identical one to take a final impression with the exact jaw relations. Could I do it with an analogue way? You bet, but this was more fun and more accurate.
So you repaired the denture, then you scanned with CBCT and then converted the DICOM to .stl, then printed the .stl? Is that right?
You got it Paul.
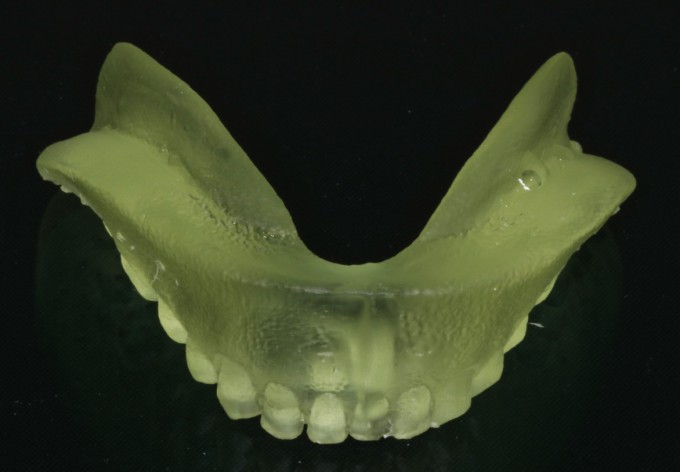
Scan on XG3D

Convert DICOM to STL in Invesilius.
Repair model in Meshmixer.
And print in Preform.


So cool Dan!!! I never thought about that application.
We just set up our printer and our goal is in the next month to be alginate and PVS impression free (unless we are doing a hybrid case).
Gene- I got three separate emails for my units each with their own STL codes to enter. We then downloaded the 3D printing software on each of the CEREC machines.
I am so so excited. Patients love seeing the printer just as much as the MCXL!
I have a guy with an NTI appliance...actually 4 of them....and he has been trying to duplicate one of the 4 which he likes the best...I cant get the lab to come close...could i scan his NTI and create a 3D printed one??
What resin are you using for splints?
KK
Can you do it? Yes, it will definitely be very close. Unfortunately the clear splint resin will not be released from Formlabs until later this year. Don't think I'd try it with surgical guide resin since it's so brittle.
Here are videos on adding bases with either inlab 16 or Meshmixer. Thanks to Baron for the tips above. I was doing it slightly different when using Meshmixer and your way is much easier (even though I only use inlab for that application really).


Purchase a Resident Membership
to watch the full version of this video plus hundreds more. Subscribe Today
Purchase a Resident Membership
to watch the full version of this video plus hundreds more. Subscribe Today
Purchase a Resident Membership
to watch the full version of this video plus hundreds more. Subscribe TodayA little virtual planning for large case I'm going in a couple weeks. I will give more details later as I have to work some technical details out yet... will present at Siroworld with a couple other things that are not ready yet
An even easier way to add a base is scan and export in the Ortho software. Adding a base in CEREC ortho will allow you to go straight to Preform to print or you can import both articulated models together and print them attached to an articulator. I'll make a video later to show this process.

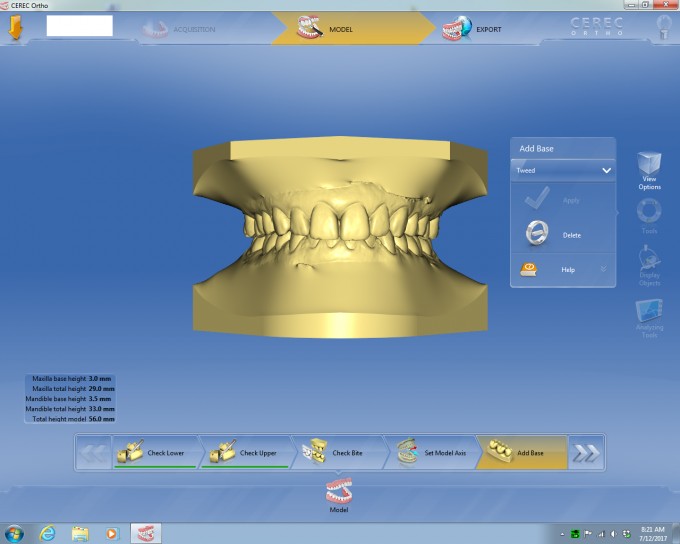

On 7/12/2017 at 9:35 am, Daniel Butterman said...An even easier way to add a base is scan and export in the Ortho software. Adding a base in CEREC ortho will allow you to go straight to Preform to print or you can import both articulated models together and print them attached to an articulator. I'll make a video later to show this process.
Dan, Now that is cool. Question. Can you scan full arches in chairside and import them into ortho to place base?
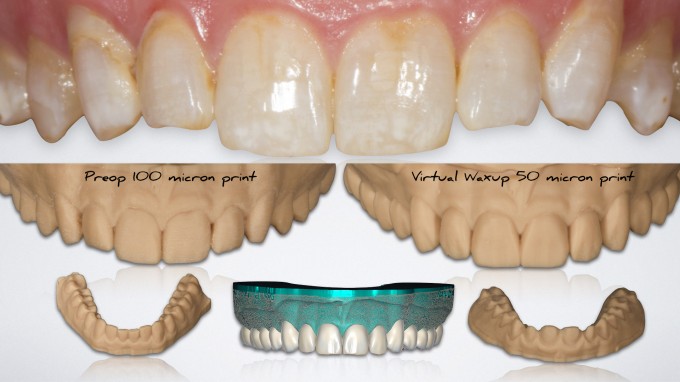
What lab do you use to get the digital wax up made? Are they essentially changing the rst image for the wax up and then sending it back so we can use that as a biocopy? Or do they do a wax up on a printed model and send back the stl file so we have to rescan the printed model?

On 7/12/2017 at 10:54 am, Ted Chamberlain said... What lab do you use to get the digital wax up made? Are they essentially changing the rst image for the wax up and then sending it back so we can use that as a biocopy? Or do they do a wax up on a printed model and send back the stl file so we have to rescan the printed model?
If you are using Inlab, there is an option "seat layers" it will convert your original model to digital wax up. If you want to keep your original model, export it first as stl.file only then seat layers and use as a biocopy. Gregory
Good point on the ortho software. I don't use it because it uses too much resin with those models.
On 7/12/2017 at 10:54 am, Ted Chamberlain said... What lab do you use to get the digital wax up made? Are they essentially changing the rst image for the wax up and then sending it back so we can use that as a biocopy? Or do they do a wax up on a printed model and send back the stl file so we have to rescan the printed model?
I'm using Bill Marais. We are still working out the protocol with my goal to have it completely seamless by Aug or September. I send him and .stl file, he uses a 3rd party software and sends be back an .stl file and I 3d Print it and use it for Biocopy. You can only import .stl files into inlab right now and you cannot mill from their on chairside units.
On 7/12/2017 at 12:29 pm, Gregory Mark said...Ted, Bill Marais using Exocad, you can do almost the same in Inlab. Gregory
You have to print the model, prep the teeth and rescan IMO to make it work. Because there is no virtual prep, it makes it very difficult IMO. Possible, but painful
On 7/12/2017 at 11:41 am, Mike Skramstad said... Good point on the ortho software. I don't use it because it uses too much resin with those models.
2 options
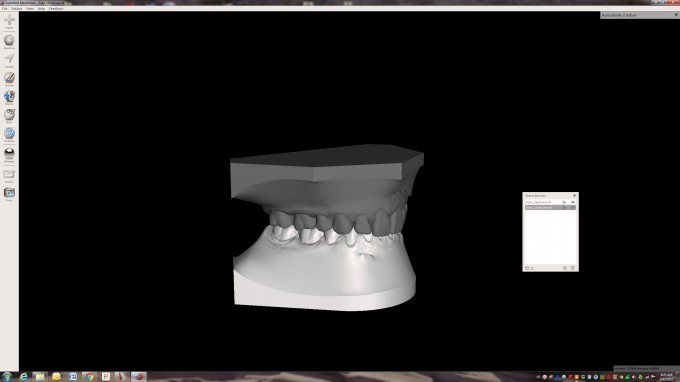
Bring model to meshmixer and trim the base or make hollow
Both will save material
On 7/12/2017 at 1:40 pm, Peter Gardell said...On 7/12/2017 at 11:41 am, Mike Skramstad said... Good point on the ortho software. I don't use it because it uses too much resin with those models.2 options
Bring model to meshmixer and trim the base or make hollow
Both will save material
Just don't make it TOO hollow. The palate can bubble...![]() AMHIK
AMHIK