Keyless surgery with Cerec Guide 2

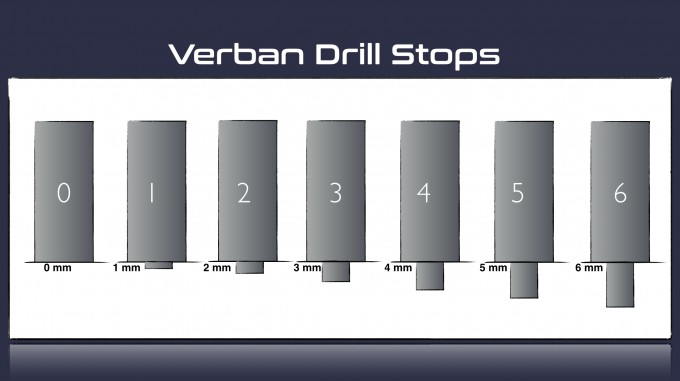
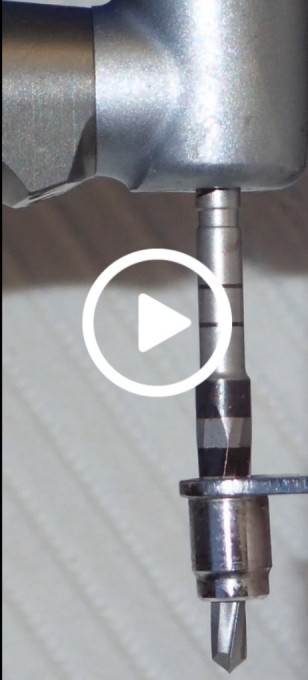
I've been using the Verban drill stops with the CG2 for some time and have enjoyed lots of success with it. I recently started using the new version of the drill stop made for the Densah burs and like it a lot better.
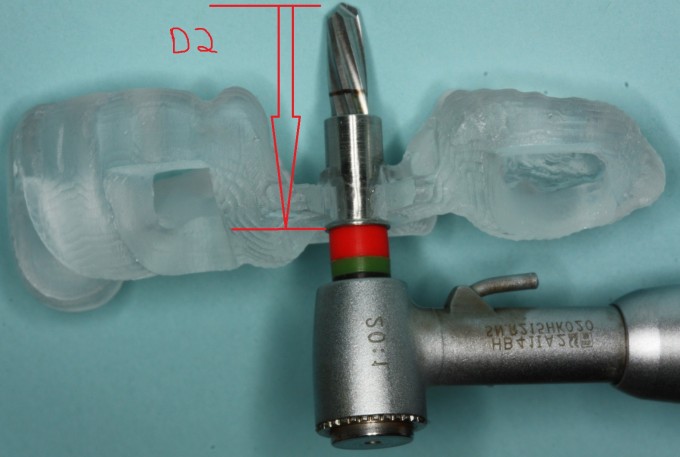
The original drill stop fits up against the hub of the handpiece, so the vertical depth is controlled when the handpiece bottoms out on the guide.
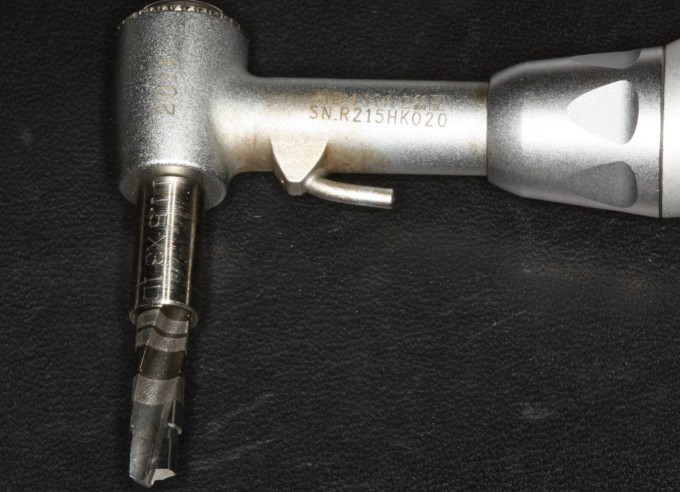
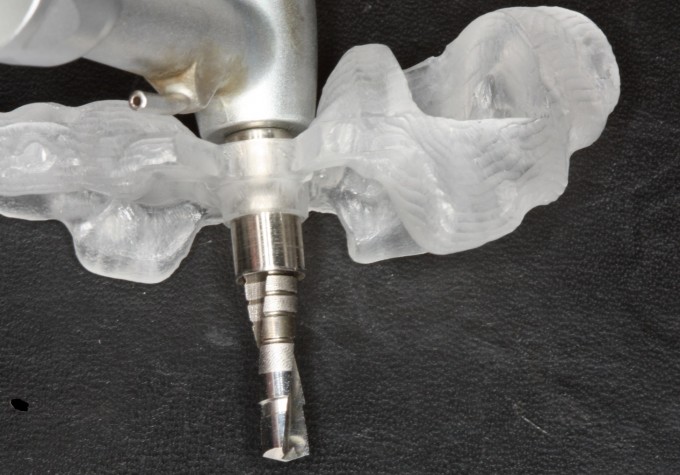
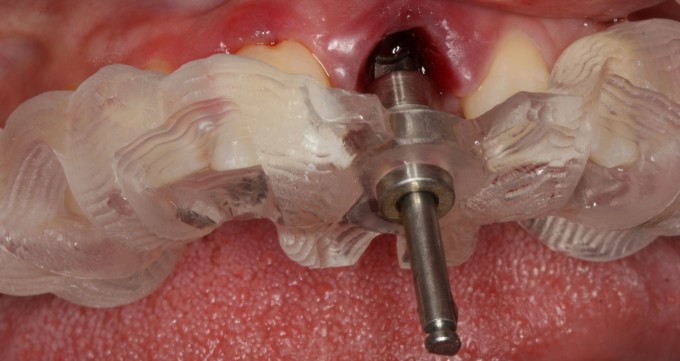
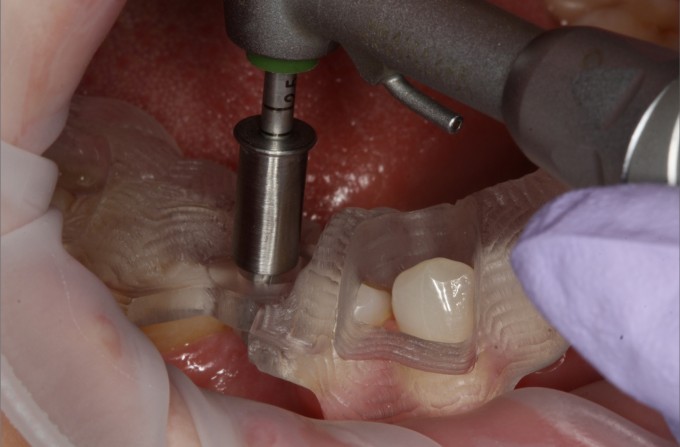
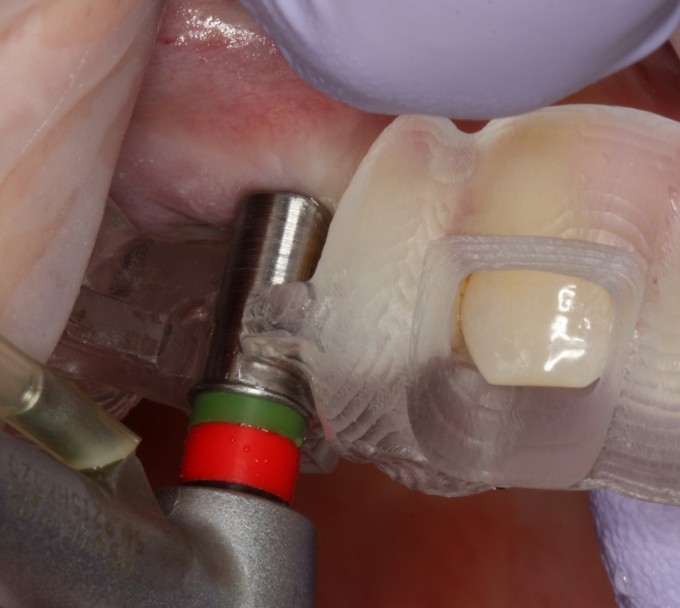
The new version of the drill stop sits passively on the Versah drill and can slip up and down until the stop makes contact with a silicone ring that you place on the drill at your desired D2 depth. It also has a lip that engages the guide. This allows more flexibility in setting the D2 value and makes for an easier vertical stop depending on the geometry of the guide.

The D2 is calculated by adding up the length of the implant, the distance from the implant platform to the gingival crest, and the length of the stop. I like to add 1mm on to that length to make sure the stop doesn't prematurely contact the gingiva before the final depth is reached.
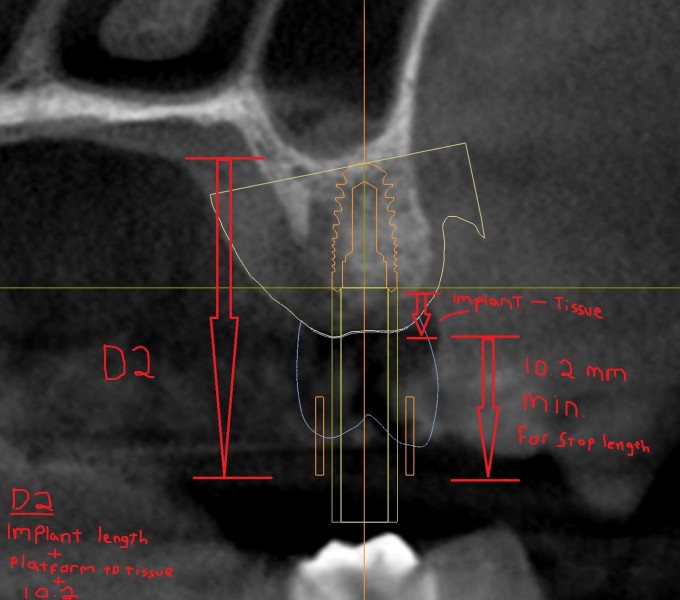
In speaking with Dr. Verban, I believe there will be a modification with the silicone stops being made of metal and added to the stop, but the premise will remain the same. This stop allows the ostetomy to be performed for most implant types and situations using a minimum amount of costly instruments.


Very cool, Dan and Emil. Farhad showed me how he uses only 2 drill stops (a short and a long) for each case. Basically since the handpiece acts as the stop, the drill stops function to keep the drill centered in the guide hole. This simplified the drill stops that needed to be used, but also limited the D2 options. This looks like a nice evolution in the system. Thanks for documenting it! See you this weekend, buddy!
J


Dan,
Did you develop a table/recipe for quick set-up? The only challenge I see with this system is needing to "Translate" for lack of a better term, when setting the D2.
I am wondering if you feel the 10.2 mm length of the sleeve might be a bit too long. I did one case with this system, and actually had a bit of an issue with the metal sleeve hitting the bone before I was at full depth, causing the guide to lift and deflect a bit. I did not realize at first what was happening and ended up with a bit of deviation in the osteotomy. As the drill drifted distal into some immature bone, I decided to graft and close to avoid having the implant slip distal at placement.


Hi Dan
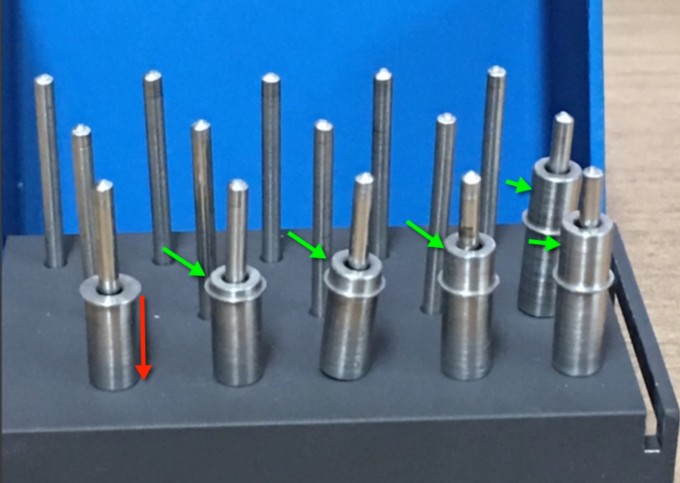
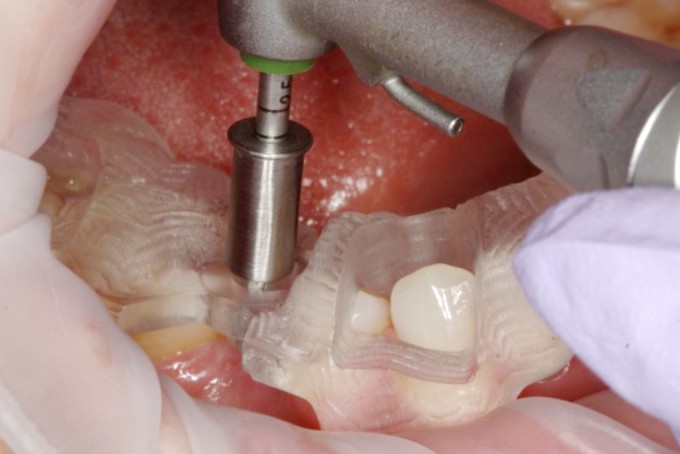
Excellent post on 'how to use" my new version. I have added an extension to the top of the V-2 to replace the need for the o-rings. My original version was handpiece specific and with the new version you can use almost any handpiece.
Here is a photo of the extension built into the stop. The extensions are in 1mm increments. 1-6mm and one with no extension.
On 8/23/2016 at 3:33 pm, Marc Thomas said...Dan,
Did you develop a table/recipe for quick set-up? The only challenge I see with this system is needing to "Translate" for lack of a better term, when setting the D2.
I am wondering if you feel the 10.2 mm length of the sleeve might be a bit too long. I did one case with this system, and actually had a bit of an issue with the metal sleeve hitting the bone before I was at full depth, causing the guide to lift and deflect a bit. I did not realize at first what was happening and ended up with a bit of deviation in the osteotomy. As the drill drifted distal into some immature bone, I decided to graft and close to avoid having the implant slip distal at placement.
Marc,
I think if the sleeve was much shorter, you might have a problem with the drill engaging the bone before the sleeve can enter the guide. This would basically allow the drill to be unguided for the first part of the osteotomy. I don't really have a quick recipe for the D2, but if you want to use a standard D2 of 23 or 24 and just double check in the CBCT that you have at least that much clearance, that would work. I would think using the measure tool from the apex of the implant through the gingival crest and up another 11mm to be safe would be a quick way to see the D2 in the cross section view and would only take a minute.
That looks great Emil. Using the silicone stops works well, but having to put 2 or 3 rings on each drill slows you down a bit. Looking forward to trying the new ones.

Very nice, I have been thinking of getting the stops. I did get the digital enamel guides that are compatible with Biohorizons so I no longer have to use a work around. Great pictures thanks.

@ everyone: If you look at last week's and today's Academy Online Curriculum webinars you will find a detailed explanation of how to use the Verban Drill Stops with CG 2, including the technique Dan posted above.
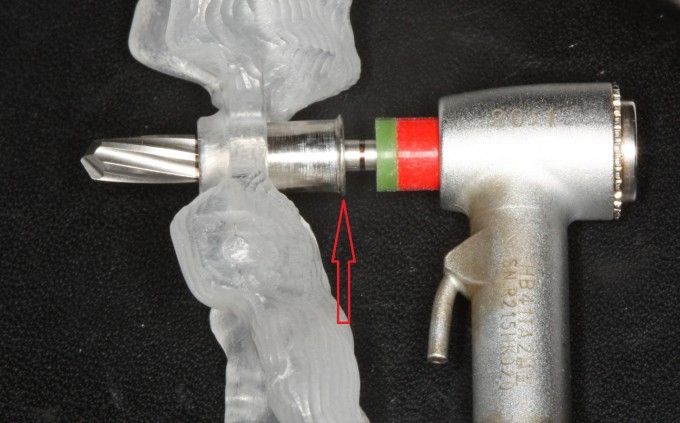
@ Dan: Great documentation. However, I think estimating the soft tissue thickness is not accurate enough for me so I calculate the D2 differently:
For the Saechin handpiece the length of the Densah burs to the hub of the handpiece is 26mm for all the drills except the 2-3 largest diameter ones, which have a length of 27mm (for other handpieces these values are different but you can easily measure them yourself for your handpiece). Since I never use the 2-3 largest Densah drills I typically use the 26mm value. For my D2 I then simply subtract 0.2mm for the stop with just the lip (the one Emil calls the "0" one) and the corresponding number (1.2-6.2mm) for the other stops. If you are using the silicone stoppers you do the same....The red stoppers are 3mm and the green ones are 1mm so in Dan's case above the D2=26mm-4.2mm=21.8mm.
@ Marc: If you used Emil's V2 drill stops for the Densah burs (the ones that freely slide up and down the drills), I don't see how you could hit the bone with the stop before you reach the full depth of your osteotomy. Using the Saechin handpiece you would have 15.8mm of drill length before the stop would hit the bone....So unless you were placing a 16mm implant or using a different handpiece or the original version of the drill stops (that don't freely slide up and down) I don't see how you could hit the bone first?
Farhad
Farhad,
Just so I'm clear, you start every D2 at 25.8 (length of drill in handpiece minus lip of stop) and shorten the D2 as needed with the silicone rings, subtracting the ring thickness from the D2? In my example I measure from the drill tip to the underside of the lip. Is one way more accurate?
2 questions:
1) does it matter what you set the D2 at as long as it's not shorter then the max length of 25.8 and not too short for the drill stop to prematurely impact the tissue? if so, do you need to know that exact thickness of the gingiva, as long as you stay well above it with the stop?
2) once the CEREC scan is imported into Galaxis doesn't the imported model accurately show the gingival contours as long as the image stitches correctly with the CBCT?
I'm sorry if you covered this in the Webinar, as I haven't had a chance to watch it yet.
On 8/23/2016 at 4:11 pm, Daniel Butterman said...That looks great Emil. Using the silicone stops works well, but having to put 2 or 3 rings on each drill slows you down a bit. Looking forward to trying the new ones.
Dan
Not only the inconvience of placing the silicone rings but to be honest------they will compress and the D-2 is dependent on the force of the operator. With the metal extensions the drilling distance is precise.
Emil
For clarification!
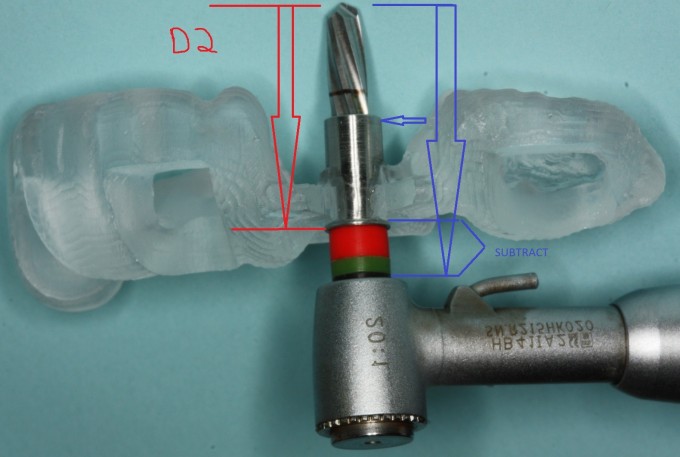
The distance from the bottom of the lip to the tip of the drill is 9.9mm.
The thickness of the lip is .2mm
The D-2 is calculated from the base of the lip-----------the .2mm is not taken into the equation.
The chart for different handpieces has been calculated to provide the correct stop to be used for the planned case.
If you were to place a 10mm implant ---the number stop would be different depending on the type of handpiece you are using.
On 8/23/2016 at 6:46 pm, Daniel Butterman said...Farhad,
Just so I'm clear, you start every D2 at 25.8 (length of drill in handpiece minus lip of stop) and shorten the D2 as needed with the silicone rings, subtracting the ring thickness from the D2? In my example I measure from the drill tip to the underside of the lip. Is one way more accurate?
2 questions:
1) does it matter what you set the D2 at as long as it's not shorter then the max length of 25.8 and not too short for the drill stop to prematurely impact the tissue? if so, do you need to know that exact thickness of the gingiva, as long as you stay well above it with the stop?
2) once the CEREC scan is imported into Galaxis doesn't the imported model accurately show the gingival contours as long as the image stitches correctly with the CBCT?
I'm sorry if you covered this in the Webinar, as I haven't had a chance to watch it yet.
In full disclosure---I am not a cerec user .
With the new design---the silicone is replaced with stainless steel. The silicone can compress up to 1mm or so depending on the pressure of the operator. The steel does not compress so I think the most accurate is from the base of the lip to the tip of the drill. The only variance will be the type of handpiece. Measurements have been taken for various handpieces and a chart made to calculate the D-2 using different handpieces.
To be honest---"priceless"
@Farhad - when Emil asked me to try out the system, my thought was to create a cookbook type formula of available D2 dimensions based on the rubber stops sent with the original V2 stop.
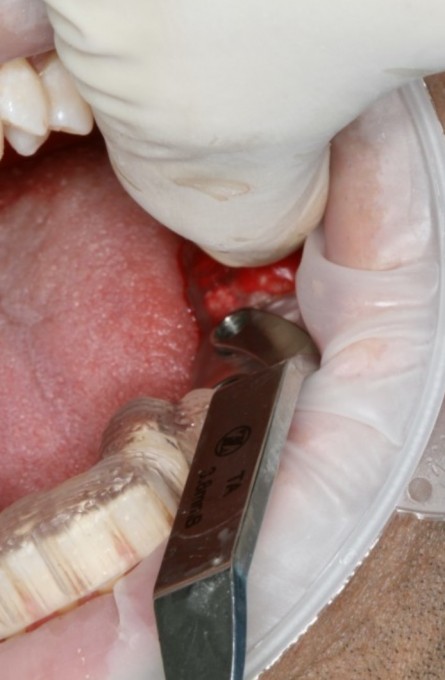
When I planned the case, a 5 x 10 at number 30, as I recall, I planned the implant at approx 1 mm subcrestal at the facial of the implant, and selected from the available D2 choices to place the top of the guide high enough for easy access, yet as low as reasonable to minimize the potential deviation of the drill during osteotomy from " wiggle " due to play between the shank of the drill and the stop and between the stop and the guide. I missed the fact that, at the D2 I selected, the stop would prematurely contact some bone that was a little higher on the mesial of the site.
The issue I had was not because of the design of the stop, which I think is great, but due to operator error with the large number of moving pieces in the equation. I simply did not think of the version 2 as a "stop" and missed this detail. My go to osteotomy drill has been the camlog guide system which features a cutting edge as it progresses up to the portion that centers it in the guide, so I just was not thinking about the bone stopping forward progress. Frankly, I then pushed too hard, lifted the guide, and deflected to the Distal, an error compounded by finishing freehand and slipping even further to the distal.
Rather than being overly concerned with the potential wiggle, what I should have done was pick an arbitrary D2 that allowed adequate clearance between the bone and the stop, similiar to Dan's solution of adding in an extra 1mm for clearance. Unlike most other guided workflows, with this protocol you need to be aware of the distance from the top of the guide to the bone or soft tissue if doing flapless.
Marc: That makes sense if the D2 was set too shallow in your case.
Dan: All your assertions are correct. Now I understand how you measured the soft tissue. I think both methods work...I just find it easier to reduce the number of variables I am measuring.
Also and this goes to Marc's point: I have said this before but for me this method is another alternate method and not necessarily my primary technique. I think Emil's drill stops are an indispensable adjunct since the traditional technique has some short-comings in certain cases but I personally always try to go with the traditional technique first and if that doesn't work out then I revert to the alternate workflows.
Farhad
On 8/24/2016 at 1:53 am, Farhad Boltchi (Faculty) said...Marc: That makes sense if the D2 was set too shallow in your case.
Dan: All your assertions are correct. Now I understand how you measured the soft tissue. I think both methods work...I just find it easier to reduce the number of variables I am measuring.
Also and this goes to Marc's point: I have said this before but for me this method is another alternate method and not necessarily my primary technique. I think Emil's drill stops are an indispensable adjunct since the traditional technique has some short-comings in certain cases but I personally always try to go with the traditional technique first and if that doesn't work out then I revert to the alternate workflows.
Farhad
Farhad
Yes they do have short-comings and we are striving to improve.
The question in my mind which approach is best clincally?
or
I think we all can agree it is best left up to the personal preference of the clinician.
Emil