Revolutionizing Practices Using Digital Dentistry: Part 2

By Dr. Ahmad Al-Hassiny
Sponsored by Ivoclar
In Part II of this three-part series, Dr. Ahmad Al-Hassiny shares the workflow processes that maximize his clinical efficiency and profitability as well as helpful tips to ensure success of the single-visit CAD/CAM restoration.
Part II
Transitioning a traditional dental practice to a digital workflow offers a unique set of challenges for practitioners steeped in the conventional analog treatment process. Certainly, that was true in our situation here in Wellington, New Zealand where our independently operated clinics would need to make that transition. As one could imagine, the first challenge was the expense of outfitting each of our clinics with CEREC® CAD/CAM systems, let alone all the other intraoral scanners, milling machines, 3D printers we have purchased over the years. This undertaking was an incredibly significant investment, not to mention the inventory of materials each clinic would require. The second major hurdle, and probably the most critical challenge, was the learning curve for our associates and us. However, we all agreed that the expense would be justified and the initiative profitable if we were able to perfect a digital workflow that was efficient, maximized clinical processes, and was streamlined effectively enough to minimize chairtime for patients.
As we undertook our transition, digital technologies matured, as did the millable materials. Modern intraoral scanners are now much faster and more accurate; milling technologies more precise; CAD software more intuitive and user-friendly; and materials much stronger, more predictable, and esthetic. Most importantly, our associates and I worked very hard to master and streamline our workflow processes, which directly impacted the profitability of our practices.
Today, our standard workflow from prep to design and mill for a single crown can be accomplished within 45 minutes or less, and the final crown is seated in an hour to an hour and a half on average. After we prep the tooth, we routinely use retraction cord (Figure 1) to displace the gingiva and ensure an accurate scan of the margins and a dry field of operation to avoid contamination from blood, saliva, or crevicular fluid. We take an intraoral scan using CEREC Primescan for our same-day dentistry and design using CEREC Biogeneric software. Our dental assistants are fully trained to be proficient with using CAD software (Figure 2-3) and do all of our CAD designs with clinician oversight, and approval of the final design, and the design is then sent to the milling machine (Figure 4). Our staff is also trained in all of the post-processing steps, from the crystallization firing process to staining and glazing the final restoration (Figure 5). In the meantime, the retraction cord stays in place so that during the seating of the final crown the fit at the margin is clearly visible and once cemented, excess cement is removed as the cord is removed. Most critical to this process and the profitability of our practices is that while the design, milling, and post-processing is taking place, our clinicians are busy seeing and treating other patients. Single-visit dentistry can be immensely profitable if done well. Now 95 percent of the work that was once sent to the laboratory is completed in-house. This effectively slashed our lab bill by more than 70%.

Figure 1: Application of a retraction cord around a prepared tooth before scanning displaces the gingiva and ensures an accurate scan of the margins as well as a dry field of operation.

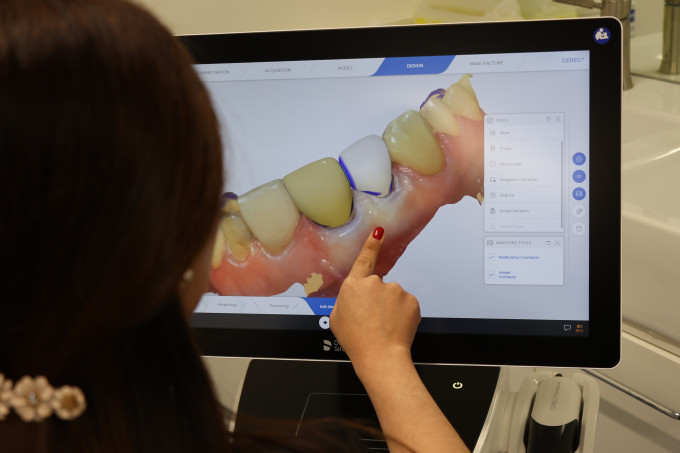
Figures 2-3: Our dental assistants are fully trained to be proficient with the CAD software and do all of our CAD designs with clinician oversight, which frees me to see other patients during this same-day workflow process.

Figure 4: Our dental assistants also process and mill same-day restorations.
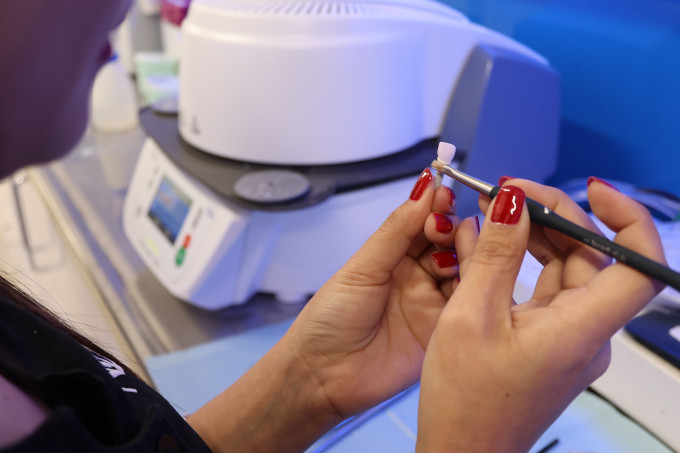
Figure 5: My dental assistants also perform post-milling staining, glazing, and crystallizing of the IPS e.max CAD crowns. The Programat CS2 firing furnace allows for the IPS e.max CAD crowns to be fired within 15 minutes.
My advice to colleagues who are thinking of entering this space is not to be afraid of the cost, learning curve, and new workflow processes. We hire new associates steeped in the analog process, and within about two months or less, they are proficient with the CAD/CAM process and workflow. Even if you are doing same-day dentistry already, the key to that transition or perfecting your workflow is immersing yourself in online and in-person learning from those who have mastered the CAD/CAM equipment and digital workflow process.
Also, choose a restorative material that offers the confidence of predictability, flexibility, strength, and esthetics in all areas of the mouth. Here in New Zealand, zirconia is not the typical go-to material, as it is in the States. We need a material that research has shown to have all these characteristics as well as a fracture rate of less than 1%-2%. That’s why we chose IPS e.max. Millions of these restorations have been placed globally, and the research on this material is extensive.
One vital key to success when using CAD/CAM processes is tooth preparation. Above all things, this matters the most. If you under prep or prep poorly, the entire process will be more challenging, slower, and less efficient. I, and many of my colleagues, thought we were masters of tooth preparation until we transitioned to CAD/CAM and could see our preparations on the computer screen. With the ability to examine all aspects of your preparation in 3D, you can see any flaws and make corrections while the patient is in the chair. Using intraoral scanners makes you a better dentist due to the instant feedback you receive about the quality of your preparation.
A critical area that requires attention during tooth preparation for the CAD/CAM process is adequate occlusal reduction. The primary reason for the failure of all-ceramic restorations is inadequate tooth reduction. Depending on the restorative material being used, you need at least 1mm of occlusal reduction to ensure the integrity and durability of that restoration. If you don’t reduce the occlusal to that degree, the software will compensate, and you will either end up with a poorly designed restoration invading minimal thickness or a high spot on the finished crown that risks fracture from occlusal forces.
Without a doubt, the CAD/CAM process is extraordinarily accurate and can be used for a wide range of chairside single visit cases (Figures 6-10). However, the output is only as good as the input. In Part III of this series, I will share some of the clinical cases from a single crown to full quadrant dentistry that we have completed using our same-day dentistry workflow and processes.

Figure This patient presented with a decoronated tooth, which required emergency same-day treatment.

Figure 7: CEREC and same-day dentistry enable us to provide treatment modalities that were otherwise not possible in a single visit. Because this patient needed treatment the same day, we decided to keep the root. The post and core were carried out under rubber dam.
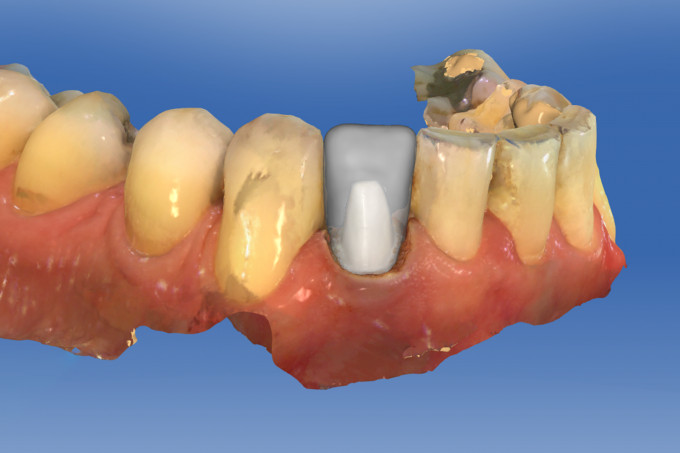
Figure 8: The preparation was scanned using CEREC Omnicam.

Figure 9: The final crown was designed chairside using CEREC Omnicam.
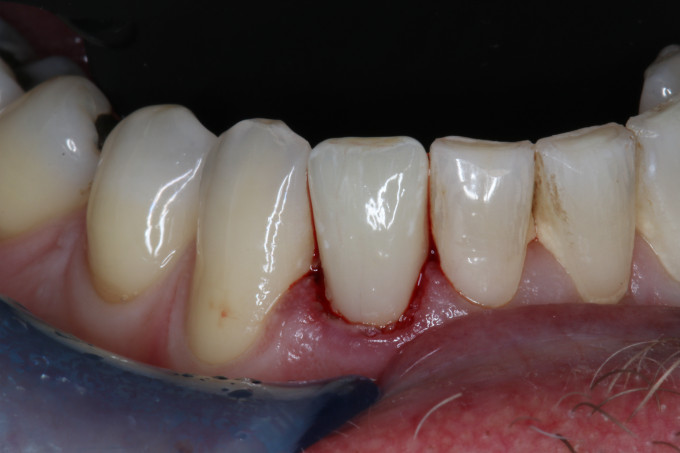
Figure 10: The final crown milled from IPS e.max CAD using CEREC MC XL achieved a great shade-match. This otherwise "temporary" fix has been in the patient's mouth for 6 years and counting.

I'm guessing you achieved some ferrule for that lower incisor with a gingevectomy? I believe minimum ferrule is 2 mm, that one is so borderline holy moly!
i like that you touched on the retraction cord component as it truly makes a difference, I still believe the algorithms for capture and image rendering have some ways to go. Most preps and margins if done right will show nicely, however I believe with triangulation and confocal techniques there are still challenges with the points of interest capture especially when it comes to margins which really are thin lines of tooth material. If I'm unsure of one area of my margin I tend to recline the patient back and look again with my loupes at the margin and its shape. This usually does the trick and resolves confusion for me.
5.0 definitely has improved margin drawing substantially, I used to use 3 or 4 black triple zero cords to make enough colour contrast to easily identify the margin. Now 5.0 has taken away a lot of the hurdles.
I have a masters degree in computer science and I'm baffled by how many cdocs on here have mastered the software and I continually learn from them. Not many dentists out there are this savvy though and I try to not sugar coat it to anyone. Just like anything else as implants or Endo, you will have to put a lot of time, money and training in learning how to do it. There will be difficulties and failures however, I believe we re bringing back dentistry with this technology back again in our hands as dentists. It's extremely rewarding to truly mark cad cam restorations as your own work...well and the ingenuity of Sirona programmers lol.
This is awesome seeing digital dentistry being used in other parts of the world. Also so glad that you guys are training your assistants and staff to make that work-flow so much better. This is what I like to see assistants that maybe didn't have the chance to go to dental school having the opportunity to become more involve in there practice.

On 3/16/2024 at 7:53 am, John Lopez said...This is awesome seeing digital dentistry being used in other parts of the world. Also so glad that you guys are training your assistants and staff to make that work-flow so much better. This is what I like to see assistants that maybe didn't have the chance to go to dental school having the opportunity to become more involve in there practice.
If interested check out our CDOCS Go courses for Assistants and our CEREC Mastery for Dental Assistants hands on course.