A Margination Refresher

Marginating a prep starts way back in the planning stage even before we take a bur to a tooth. Mentally planning out where our margins will end up before we begin will help us out later. For full coverage, we need to make several decisions. Is this margin going to be placed above, equal to or below the gingiva? Past restorations and decay will play a huge role here. Esthetics will as well. Occlusion and parafunctional habits factor in greatly, in so far as how much retention and thickness will this restoration need to survive? Many times, for full coverage these decisions are made for us as we proceed through our prep. No one wants to place a margin below the gingival crest but sometimes we have no choice.
It gets trickier when planning out our prep for partial coverage. We need to really examine the opposing teeth and how they occlude with the tooth being prepped. It is so important to avoid margin placement where an occlusal contact resides. If a margin sits on a contact, there will be rapid breakdown of the thin porcelain leading to ditching, exposure of the cement and possibly seepage, decay and ultimately a debond. For this reason, do whatever you need to do to avoid having a margin at this critical point.
Be open to changing your plan as you go. Plan for the unexpected and alter your margin as needed until you are happy with where it is. Move forward with the case and keep in mind some of the things that may help you out along the way.
We all need a little refresher from time to time, so here it is. Realize that this applies to the Blue Cam only. With the Omnicam, our options are limited to automatic and manual margin finding. The color differential of the Omnicam is superior to the Blue Cam and therefore the High Intensity view is not needed with the Omnicam models.
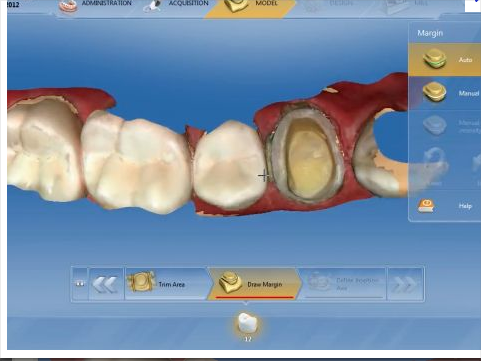
While we all strive for that margin that pops and needs only the automatic margin finder to complete the task. Real life says that it can be tougher than that. The manual margin finder can be activated by clicking the space bar once or selecting “Manual” from the window that opens on the right side of the screen. A second click of the space bar allows for manual margination with the high intensity view or you can again choose “Manual with Intensity Image” from that same window. That helps even more when a margin is a little difficult to read.
It gets tricky when you have completed margination and want to go back and adjust the margin. It may seem that returning to the high intensity view is impossible. You can access it by first clicking on the blue margin line and then hitting the space bar once or “ Manual with Intensity Image” from the window. This will allow you to alter or review your margin with the aid of the high intensity image.
Always strive for placement of the margin in a way that makes it simple to read. Work hard to achieve great tissue separation when necessary and use the above suggestions to give yourself the edge you need to assure a perfect margination of your restoration.

Good Blog Jeff. I learned this weekend that the margin can be difficult to discern visually with Omnicam images. Most likely the problem at level 2 and Accept was the ivorine teeth. Even air-abraded, the ivorine is shiny and difficult to image. However, Mentors with Omnicam experience have told me that they have encountered this problem on some natural teeth imaged with the Omnicam. I am anxious to get an Omnicam, but the software is definitely a work in progress at this time.