 Rich Rosenblatt, D.M.D.
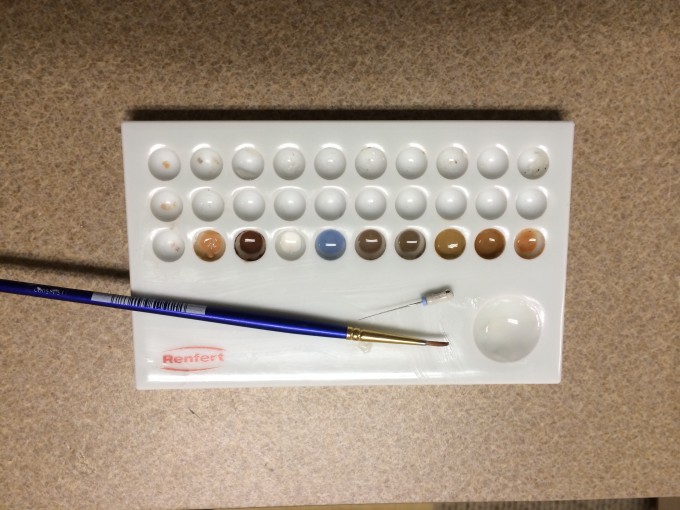
Characterizing CEREC Restorations
I just got back from doing a CEREC Basic Training this weekend and realize that we do so many blogs on prepping, designing and cementing but we neglect reminding people about tips on characterizing. I'm attaching a photo of my stain and glaze set up. This is for emax. The middle row would be for Empress and my bottom row would be for Vita. I tend to mix my Vita and Empress as needed since the majority of my restorations are emax.
My first tip is to lay out the shades and then the stains. The first 5 wells in my set up are for the emax shades 0-4. I use these at the cervical and on the occlusal table for the varying values (as in Hue, Value and Chroma) that the tooth may be. The 0 is more of a copper color and I don't use it often. The 1 shade is for anything in the A family basically. The 2 Shade is for the B family. The 3 Shade is used when I choose a C shade tooth and the 4 Shade is used for darker teeth like A4 and the D Shades. Setting it up this way makes it easy for me to determine which shade I'll be using on the majority of the tooth. I then lay out the stains that I tend to use most. I have blue for incisal translucency, white for anywhere we have thicker areas of enamel like cusp tips and marginal ridges as well as when we need to match calcification spots. I use mahogany for the fissure lines to give my restorations so depth and I use a 15 endo file to just put a small dot of it in the pits of the fissure and then drag that mahogany along the fissure lines. The goal of the stains that I just mentioned is to not really be able to see them when you apply them. A little stain goes a very long way!
My second tip is to make sure you get a tray like the one I have shown that has a cover on it. The cover will prevent dust particles from getting into the stain and making it look grainy. You can then leave the stains for weeks with no issues. What I will do is mix the stain or shade in the well to get it to a creamy consistency each morning. Having a covered tray and keeping your stains like this will save you a lot of money over the long haul since you don't have to discard what you have used each time.
My third tip is to learn how to properly mix your glaze and stains. Generally the glaze will come out of the tube at a consistency that is perfect after you agitate it for a bit. Some stains and glazes are powder and liquid an you will need to mix it till you get a honey like consistency when you draw up the glaze with an instrument. If your glaze or stain gets a bit thick, don't just add a drop of the glazing liquid right to your well. This will create a mix that will be too thin and then cause bubbling in your final restoration. To optimize your mixing, place a drop of liquid off to the side of the well, dip your brush into the liquid and then use that brush to mix the glaze or stain. This will add just enough liquid to create a perfect honey like consistency.
My final tip is to make sure that you use the appropriate brush. The best type of brush to use is a red sable hair brush. These types of brushes tend to not leave excessive brush marks so you get a nice final luster with no streaking.
Characterizing restorations is a lot of fun and is what takes them from good to great. Learn how to do it properly and you'll be amazed at how lifelike your restorations can look.