The Chairside Zirconia Revolution: The Evolution of Choice

Dr. Michael Snider
Sponsored by 3M
As I was sitting down yesterday to begin a standard appointment for a single unit restoration, I was struck by how far we have come in such a short time. Everyone has their own, unique “CEREC® journey”. Whenever I speak to a group of doctors considering integrating the CEREC technology into their practice, I always joke that it’s the gateway drug for digital dentistry. First, you’re getting a CEREC system for single unit posteriors. Next thing you know, you’re becoming an expert on materials, bonding systems, and incorporating CBCT (cone-beam computed tomography) technology into your practice.
My journey is no different. When I began practicing in 2009, I joined a practice that had a Redcam in the corner collecting dust. Although the Redcam may have left a lot to be desired, my patients and I loved it. They, just like me, were engaged instantly by the technology. Regardless of the hurdles that had to be crossed, I always found myself reaching for the CEREC instead of impression material. We were placing VITA Mark II and Empress restorations on *gasp* second molars. I had no idea at that time how many other materials would be coming to the CEREC ecosystem!
In 2010, I upgraded to the Bluecam and also added the necessary armamentarium to be able to produce e.max restorations in office. What a difference! I remember thinking how great the automatic image capture with the Bluecam was compared to having to use the footpedal on my Redcam. Being able to produce same-day, high strength ceramics became our standard workflow. The Bluecam, my Powder Meister™, and e.max were a game-changing combination for my practice.
When the Omnicam was released at CEREC 27.5 Meeting, I couldn’t wait to have the newest technology in our practice. Color Scanning?!?! No Powder?!? Every time the acquisition technology has improved, there has been a litany of materials that has followed as well.
The release of the “nano-ceramic” or “hybrid” ceramics changed the way many of us practice. The fine milling capabilities of these materials for partial coverage restorations, along with the speed of fabrication, allowed inlays and onlays to become common place in many practices.
Over the years, we have continued to have improvement in acquisition. Yes, the Primescan is amazing. I would wager that anyone that has used the Primescan would never give it back for their Omnicam or Bluecam. But, I don’t know if anything has done as much for bringing CAD/CAM into general dentistry offices more than the ability to manufacture zirconia restorations chairside.
When the announcement of the SpeedFire was released, I honestly did not see a use for it in my practice. We had years of success with high strength ceramics and hybrid ceramics. Why did I need the ability to do zirconia restorations in my practice? My how this has changed.
The early zirconias were strong, but they were some of the least esthetic restorations that I had ever produced with my CEREC system. I could appreciate the conservative preps and the ease of cementation, but I just could not get past the appearance of the restorations intraorally.
As with everything else in our CEREC world, we have seen continual improvement in the esthetics of chairside zirconia. With the introduction of materials like 3M™ Chairside Zirconia, I have found myself reaching for those white zirconia blocks more frequently than my beloved purple ones.
The 4-Y composition of the 3M Chairside Zirconia has provided excellent clinical results with a unique blend of esthetics and strength. The 4-Y structure provides 1000 mPa in flexural strength, but also allows me to deliver a restoration that I am happy to see on recall. It doesn’t have the opacity that we see with other “high strength” zirconia.
Something that I didn’t realize was a stress until we began doing more zirconia was the ease of delivery. We were used to bonding ceramics for years, but there is nothing like the ease of conventional cementation. The release of 3M™ RelyX™ Universal Resin Cement has made this a mindless process in our practice.
To say that the excess cement clean-up has been improved is an understatement. But, more importantly to me clinically, was the improvement in radiopacity. We always take bite wing radiographs after delivery of any restoration. I always like to make sure I have adequate cement clean up. 3M™ RelyX™ Ultimate Adhesive Resin Cement was not radiopaque enough for me, not to mention I could never get it cleaned before it was set. The new 3M RelyX Universal is a dramatic improvement, and if you haven’t given it a try you should. This resin cement and its associated 3M™ Scotchbond™ Universal Plus Adhesive has become our standard in office. The bonding agent can be used with virtually all direct and indirect restorations. The resin cement can be used both as a standalone, self-adhesive cement and as an adhesive cement when combined with the bonding agent. It can be used with hybrid ceramics, glass ceramics, and zirconias.
So back to the case that I was starting…
Not every case we do in the office is a full mouth rehab. We spend a lot of our time doing routine single unit dentistry and this case is a perfect example.
The patient presented with an existing zirconia crown that had been fabricated in a traditional analog fashion. As you can see from the preoperative radiograph, there was a significant overhang on the distal. We explained the need for replacement of the restoration to the patient, and she agreed.

Figure 1. Preoperative radiograph.

Figure 2. Preoperative condition.
The patient was anesthetized. We had so many materials before we began prepping that we could pick from for the final restoration. As I mentioned earlier, around 15 years ago my choices would have been limited to the likes of VITA Mark II or Empress, and years ago we would have used one of those materials and found it esthetic and predictable. But the process and the requirements of preparation and bonding were not so forgiving. Fast forward to today, where we now have the ability to select from multiple zirconias or other high strength ceramics. In this case, we selected 3M Chairside Zirconia for its conservative preparation guidelines and for its esthetics.
After removal of the restoration, you can note the inflammation present in the retromolar pad from the large distal overhang of the previous restoration.

Figure 3. Removal of Existing Restoration.
After the preparation was completed, 3M™ Astringent Retraction Paste was used for tissue retraction and hemostasis. I really like this product for preparing the tissue before scanning. The small tip on the compule allows me to place the material exactly where I want it, deep into the sulcus, where it’s tough to get to with other similar products that have larger application tips. With a smoothed prep using fine diamonds and carbide round burs to finish the margin, even subgingival, we can appreciate a nice ring of enamel that will make margination a breeze in the software.

Figure 4. 3M™ Astringent Retraction Paste
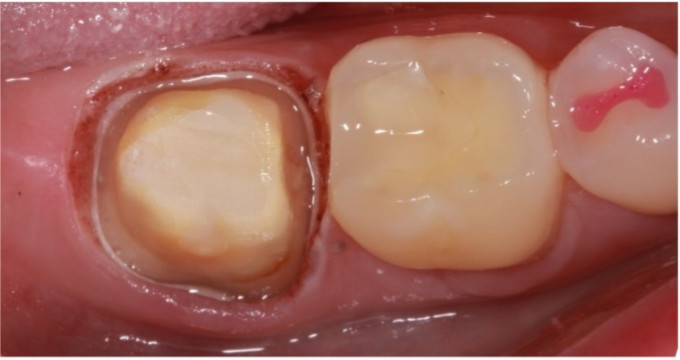
Figure 5. Final Preparation.
Delivery of zirconia restorations is stress free with 3M RelyX Universal Resin Cement and 3M Scotchbond Universal Plus Adhesive. The bonding agent does not require curing on the prep before delivering the final restoration. This removes the possibility of cured resin pooling, which can prevent full seat of the restoration. The bond strengths provided by RelyX Universal Resin Cement actually allows for delivery of the restoration with just the cement if the restoration has adequate mechanical retention form1. I believe adequate isolation is still a must, even with these improved products. In the image of the bond application, you can see the Isolite in place. The cleanup of RelyX Universal is so simplistic. Unlike other bonding resin cements, the excess can be removed after a simple tack cure without any effort whatsoever.

Figure 6. Application of Scotchbond Universal.

Figure 7. Cement Cleanup.
I love the way the tissue responds to zirconia, when the restoration is well fitting. Anytime we deliver an indirect restoration in the practice, we always take a post-operative bitewing. The lack of radiopacity was one reason I did not use the RelyX Ultimate cement in the past. The radiopacity has been greatly improved with RelyX Universal. Now I can make sure any cement interproximally is thoroughly cleaned before the patient leaves the office. Me and my hygienists, both hate finding cement hanging out interproximally months later on recall.
In the two radiographs below, you can appreciate the cement and then its subsequent removal.

Figure 8. Excess Cement Interproximally.

Figure 9. Thorough Cleanup of Cement.

Figure 10. Preoperative Radiograph

Figure 11. Initial Presentation

Figure 12. Postoperative Radiograph

Figure 13. Delivered final restoration
The final restoration was a great improvement over the previous ill-fitting restoration. For CEREC users, these are the type of restorations that have become commonplace in all of our practices. What we take as commonplace is still impressive to many patients. Due to the continual improvements to materials and CEREC technology, I think it will continue to be so.
With so much interest in chairside zirconia restorations, I’m looking forward to the next article in this series where we discuss the “Y?” when it comes to 3Y, 4Y, and 5Y zirconias.
References
1 RR#133 3M Resin Cement Bond Strength to Multiple Substrates. (dentaladvisor.com)

Great article and food for thought for people who don't use zirconia . Can you describe how you use and for how long the 3m paste. I use it for gross bleeding but always seem to need to double cord afterwards.

The retraction paste works very well if it’s given the right amount of time.
Couple of tips for maybe not needing double cord:
First, I always finish my margins using a slow speed carbide round bur, not only does it polish the margins very well, but it removes a lot of little tissue tags left behind by the diamond bur.
Second, use some form of compression. A cotton roll will suffice most of the time, but I make little custom comprecaps from just a small amount of blue mousse. Works like a charm.